
|
As a writer, a wire wrapper, or artistic personality, in general, learning to comment critically and accept a critical analysis of my work has always been a very integral part of my creative growth. AllPoetry is an online forum for sharing poetry and fiction, and was one of the first (and most prominent) fixtures in my online experience sharing work with a wider audience, and an incredible learning opportunity, both in commenting critically and accepting critical comments, but also an opportunity to learn to differentiate between a critical comment and a personal attack. Artists almost always encompass their work, on very fundamental levels. When we create, we imbue in our creativity a piece of ourselves, a little slice of our soul, so when we put that work to the world and praises aren't immediately raining down upon us, there's a sting in that which sometimes overshadows the opportunity these situations present... an opportunity to understand our audience, our product, our art, artistic trends and personal tastes. So I'd like to take this opportunity to discuss the "art" of critical commenting, how to offer a critical comment and, more importantly, how to be receptive to a critical comment. COMMENTING CRITICALLY First, it's important to understand what, exactly, a critical comment is and is not.
A few months ago, I posted to social media a wire wrapped pendant to which I added an olive green knotted paracord necklace. The reaction was, not surprisingly, quite mixed, because the two mediums are vastly contradictory. I encouraged critical comments, and received some that were very thoughtful and thought-provoking, and some that were really just empty "attacks" by the handful who had an (apparent) violent aesthetic reaction to the combination of materials, and some that were "fillers" who had nothing critical to contribute. The following is a (fictional) example of the type of negative comments I received, and exactly what not to do when commenting critically: "I don't like the green. You should have gone with a black or white. And it's just too big." Is there a reason you didn't like the green? Why would you have preferred black or white? Though an opinion was offered, there was nothing to substantiate it beyond his or her own tastes. This is what I like to refer to as the "unhelpful helper". They might actually believe their comment offers something to the discussion, or helps the artist improve, but in reality, they've not offered any solutions. The following is a re-creation of the comment above, but written critically: "I find there isn't enough green in the stone or focal itself to support the color of the cord. There are pinks and peach in the stone, and the wire is copper, so perhaps a red cord would accent the tones already present. Black and white are always neutral color choices that might also frame the wire work in a complimentary manner. The knot work is large and intricate and seems to over-power the detailed wire weaving, so cord in a smaller diameter might allow the viewer to experience each element in the design as part of a whole, and not in spite of each other." See how this comment offers solutions? It focuses on a flaw, or perceived flaw, or opportunity for improvement, and then offers a fix, while distancing itself from an emotional reaction to the piece, or from an emotional interaction with the artist. Some art is meant to incite an emotional response, and distancing oneself from an emotional comment is difficult. Let's say someone posted a black and white painting they completed, of a sobbing woman. The strokes are heavy, the outline is abstract, the features are distorted. And you think "This is depressing!" Commenting as such is, however, not productive. Not for you, as you experience the work, and not for the artist. It is fine to express your emotional reaction, but only in the context of the elements of the work. Instead of "This is depressing!", a critical comment might say "The heavy strokes evoke a burdensome feeling of oppression. The distorted facial features symbolize, to me, a lack of acceptance, thus inspiring a sense of despair and sadness. The hunched and sobbing form totally encompass the spirit of depression, but I feel a touch of color, a soft skin tone perhaps, might have involved me more in the work, since the black and white appear so stark and offending and separate me from the subject". I like to think of it this way: If a critical comment evolves into a discussion, then you've commented well. Taking the time to have a reaction to the art, and to analyze that reaction, is just as important to you as it is to the artist whose work you are viewing. You'll find that taking an objective look at the work of others often helps improve your own artistic endeavors. RECEIVING CRITICAL COMMENTS Just as it's important to understand how to comment critically, it's equally important to receive critical comments as intended. I remember once, when commenting on a poem I'd read, I discussed the rhyming form utilized, how the meter was inconsistent and how removing a word from a line would create a stronger flow, and the response I received was immediately defensive: "Well if you don't like rhyme, don't read it!" The author posted it in a contest called "Critical Comments" and specifically noted he or she would prefer honest critique. I call this "projection", when we think we want a critical comment, but really we want readers or viewers to validate our own opinions. Now if we're creating art only for the sake of creating art, our own opinions are the only ones that matter. But if you are creating art for an audience, or a customer, then we can utilize critical comments to understand our target audience, and to improve on the relationships we build with our audience, via our art. In which case, it's important to separate the comments we receive from our own experience with our art. Though some comments are intended to upset, to express discord or are attempts to help without an adequate understanding of tact, having the appropriate reaction to the comments, as the comments were intended to be received, is always a helpful tool in furthering ones art. If we can approach our comments in a responsible manner, using words and phrases that specifically distance our reaction to a piece from the artist who created it, if we can comment by utilizing technical terms, by addressing each element of the work, systematically, we can also learn to READ these types of comments as we receive them. The lesson here is that learning the art of commenting critically, allows you to identify and receive a critical comment. I recommend joining forums or groups which utilize this tactic, offering critical comments on established members, practicing the analysis of the work and your reaction to the work, and then putting your art out there to receive the commentary in return. Keeping in mind, of course, that a negative comment without a critical element is simply the signature of a bully. And that, my friends, is another post entirely.
5 Comments
Some of you may know that late last year I began a YouTube channel, Go Art Yourself, which I describe as an artistic endeavor separate from Nicole Hanna Jewelry, but with a heavy focus on wire work, in general. And my inaugural video was a no-nonsense time-lapse of some wire work, mostly in an attempt to learn how to film and edit film for YouTube. It was a... uh... learning experience. Anyway, I followed it up with a quick how-to easy painting video, and then... well.. nothing. And I have no excuse aside from unabashed laziness and a fear of the camera. But, I've been asking members of my Facebook group, Wire Wrap Tips & Tutorials (which I'll talk more about below), for video suggestions, making notes and itemizing those suggestions on a perfectly organized check-list, to which I likely wont adhere at all. Sigh. And finally, despite myself, managed to finish a few videos in a Quick Tips series I intend to continue (based on those suggestions), while working on a pendant featuring a lovely bead by Darcy York. And you know, I thought I did pretty good.
Until I watched it. For real, I'm seriously awkward, people. Talking to a camera, to an empty room, filled me with some mild psychosis by the time the evening closed on me, and I wrapped up the recording. I think I continued to talk to myself for the hour following filming, remarking on how painfully gawky the experience became. Though I tried my hardest to avoid "uh" and "um" every ten seconds, I did manage to pause uncomfortably and repeat myself into neurosis. But I didn't practice, because I thought that if I stopped to practice I'd only be giving myself another excuse to postpone the final video. And that's a totally viable excuse on my list of excuses that I will likely use at some point in the future. But, I posted three videos, which aren't intended to be detailed tutorials or a studied look at wire weaving. Just three sneak peeks into my methodology, touching on some questions and suggestions posed by group members. There will be many more to follow, with a (hopefully) less ungainly air. You can watch those videos at my YouTube channel, or by checking the Tutorials tab in the menu here on Nicole Hanna Jewelry. And if you'd like to offer suggestions of your own, you can leave a comment here, on the videos or by joining the Facebook group mentioned above. Wire Wrap Tips & Tutorials is open to customers and students who have previously purchased PDF lessons (this is non-inclusive of the free treasure hunts or standard free tutorials offered) either directly from nicolehannajewelry.com, or other approved venue, and membership may be contingent upon proof of purchase. Some venues do not provide me with customer information, and some customers purchase via accounts or names not linked to their Facebook presence, which makes it difficult to verify purchase. Usually sending me a quick IM with some proof of purchase will expedite membership approval. And I try to post discounts or deals, tutorials or contests exclusive to group members, and everyone is encouraged to share their work, offer critical comments or simply acknowledge great creativity when we happen upon it. So far it's building into a wonderful community! So, all things considered, I managed to get some things done this week! I have some great new tutorials coming in April, a fantastic online retreat on the calendar for 2016, for which I'll be releasing more information later this year, a local class at Beads to Live By, in September, and I'm not even procrastinating, which is like total crazy talk, because I always procrastinate. And all this despite hearing an audio recording of myself for the first time and wondering how I don't hear my own Southern accent when I talk! Weird. Just... weird.
Though some consideration needs to be given towards the photographic equipment used, the goal of producing a great image doesn’t stop with ones camera, setting or props. Unless every condition is ideal, most images will need to be processed through editing software. This article will discuss types of software, and the editing process used to finalize images for product photography. Choosing a Photo Editing Program There are many photo editing programs on the market, though most provide far more options than a product business owner will ever need. My advice: if you aren’t educated in graphic design, skip Photoshop and settle for a simpler Adobe product. Lightroom 3 is a good alternative, currently available for as little as $60, and is more user friendly than the entire Photoshop suite or Lightroom 4. It has just been announced, however, new Adobe products will no longer be available for purchase but only accessible with a monthly leasing option. Four free options are Serif Photo Plus, Picasa, Gimp and PhotoScape. Serif is a highly praised free program, recommended for the prosumer, with some features similar to Lightroom. It requires an account to download and the process prompts the user to install an unnecessary tool bar, but may be acceptable for a quality free program. Not available for Windows 8 users. Picasa is an acceptable free program, but better suited to editing family photos for fun, and less suited to professional imagery. The options are preset or otherwise incredibly limited, allowing less user control than is necessary for quality images. Gimp is advanced shareware, with a range of options similar to Photoshop, best used for photo manipulation than for editing. The program is “space heavy” on ones hard drive, making functionality on small devices such as tablets and netbooks almost impossible, and requires a considerable learning curve to master. For the purposes of this article, the focus will be on PhotoScape, which provides the most options for product image editing, while requiring minimal experience. It should be noted, according to Digital Trends: “PhotoScape software is free to download. But it’s part of the Open Candy network, and runs ads for other “recommended” software. This is isolated to PhotoScape, and won’t infiltrate the rest of your computer with adware….”. I have used PhotoScape for years and have never had issue with my virus detection software or computer as a result of this product download. However, I recommend avoiding CNET for your download, since malware has been associated with that particular source. Always download programs only after thorough review of the source. Editing The Image: Crop  CROP ONLY AS NECESSARY! Note: In writing this article, I’ve used this banner image for reference. My camera has a maximum image size of 4288 x 2848. For the purposes of posting product images online, and for the sake of saving space, most images will need to be resized and/or cropped, but keep it reasonable or you risk degrading the quality of your image. If your website is image-heavy, file sizes of 1000 pixels or less is recommended. You can crop images to any size or dimensions you wish using the “Crop” tab on PhotoScape, located in the horizontal tool bar to the right of your image files source. Because I knew I was creating an image wider than it would be tall, there are portions both to the top and bottom of the “focal” that should be cropped. Though it is optimal to get your image centered properly in camera, to avoid image degradation during the editing process, web design does not always allow for the utilization of the original image size and shape. 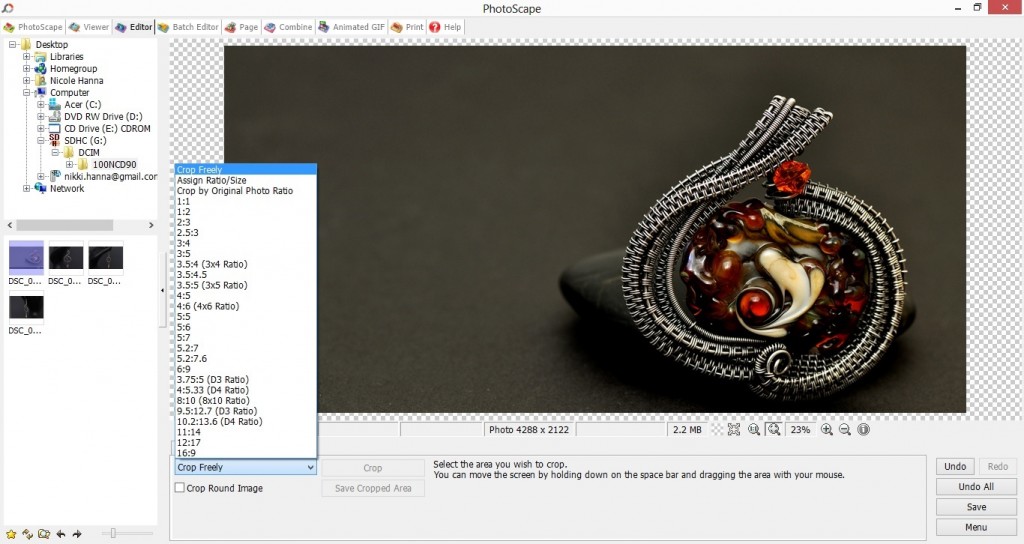 Above is what the crop function would look like in-program. The options include assigning ones own ration/size, crop freely, or use a preset ratio. Editing The Image: Color  You may note the temperature of this cropped image is cool, with a blue tone. This is the temperature of the image as it appears, transferred directly from the camera. Though every camera offers the option to adjust temperature controls internally, per the light source used, this setting will need to be adjusted with every product. The reason: The camera reads light and color based on the product, setting and props. If any of these three properties change, the temperature will need to be adjusted. Though many cameras can adjust automatically, the subject, setting or props can still be misinterpreted by the machinery and is better dealt with in post-processing. 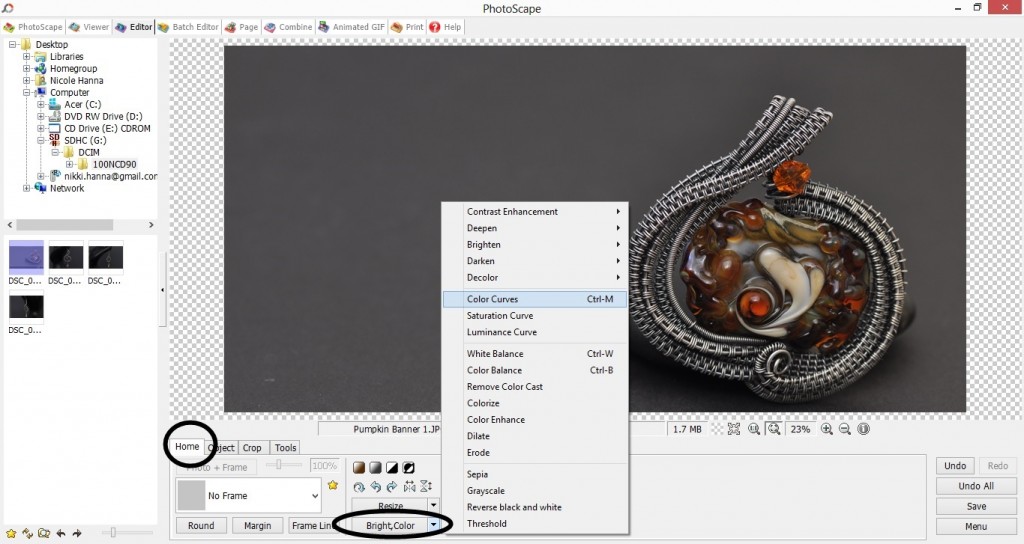 To adjust the temperature, I suggest avoiding the “Color Balance”, “White Balance” or any temperature controls directly and manually adjust your colors via the “Color Curves” option located by clicking the arrow next to “Bright, Color”. Once “Color Curves” is accessed, the blue, yellow and red tones can be adjusted individually. In this case, decreasing the blue tones, or increasing the red and yellow tones will procure a more natural image. For images more yellow or red in tone, the opposite will be true. Editing The Image: Contrast, Depth & Brightness  After reducing the blue tones and matching the gray background more appropriately, it is time to adjust contrast, depth and brightness of the image to showcase its colors, and emphasize the attention to detail. The image, as shown above, though acceptable for casual photo sharing, isn’t effective as a marketing or sales tool, with flat colors and uninspiring setting. In order to best promote the product, the image needs to pop with a focus on its intended subject. 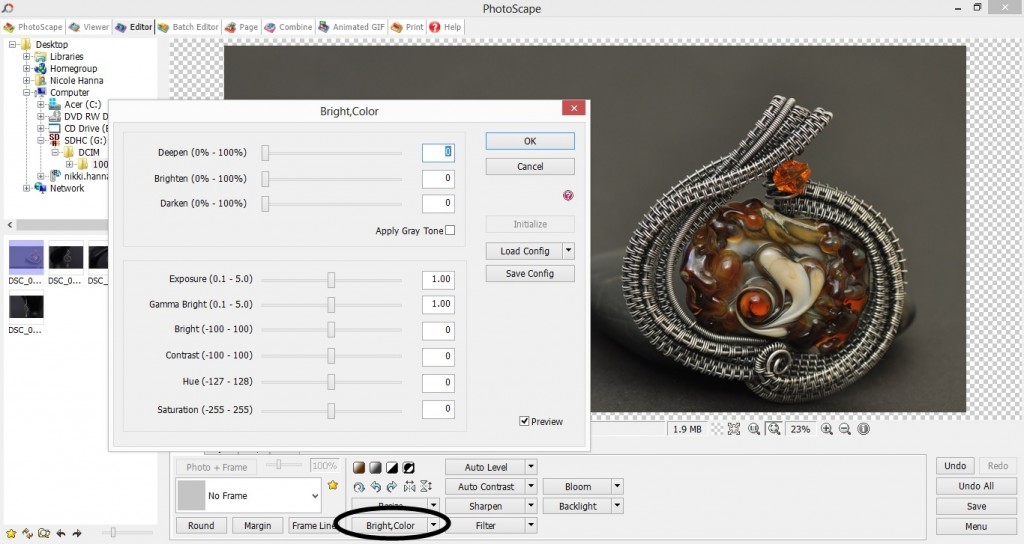 To access the Contrast, Depth and Brightness functions, locate the “Bright, Color” tab and click. Please note, you are not clicking the arrow in this case, as in when accessing the “Color Curves”. Contrast is, for me, the most important function and the one I most highly recommend. This option will emphasize powerful colors, or create power where non otherwise existed. This will also allow whites to whiten and blacks to darken, creating a separation between the subject and its background. This function will, however, darken the image as a whole, which might later need to be adjusted utilizing the Brightness scale. Depth is also a great tool in establishing a separation between the subject and its background and can be used in conjunction with the Contrast scale, or independent of it. Editing The Image: Region Brightness and Blur  Comparatively to the previous image, this version is much stronger, with prominent colors and detail. There is now a clear definition between the subject and its background which can be further emphasized utilizing the “Region” option, allowing the user to emphasize or affect select sections of the image while the rest of the image remains untouched. 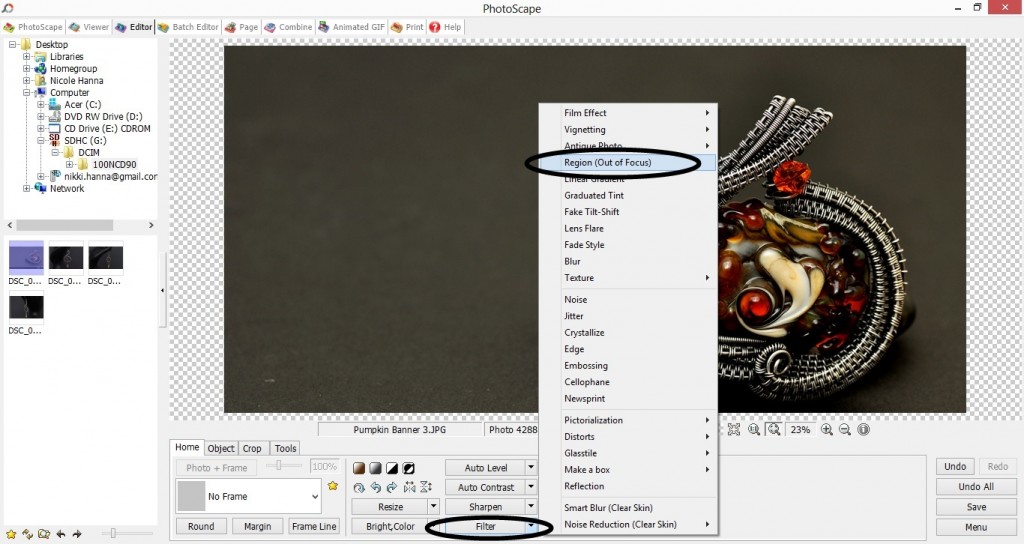 The “Region (Out of focus)” tab is located in the “Filter” option, directly to the right of the “Bright,Color” tab. 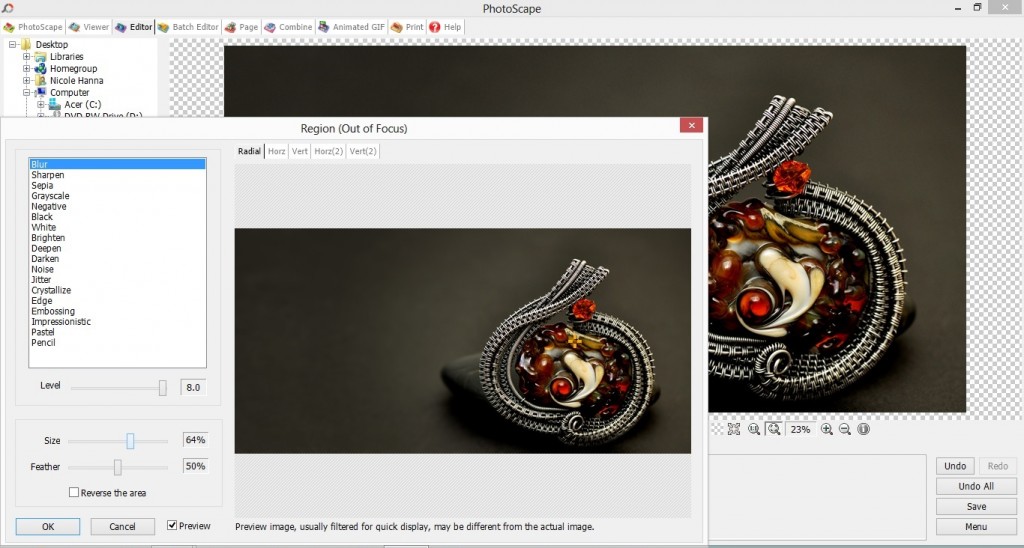 The “Region” function allows the user to brighten the subject itself, with a feathered or sharp edge, blur the background so the focus remains on the subject, change tone, color or depth. Though options such as creating a pencil, painted or embossed effect are available, these are not recommended for product photography. I suggest utilizing these options sparingly and in moderation. Sharp color edges, vignettes or blurred backgrounds often prove a greater distraction than not. Editing The Image: Clone Stamp  After creating a powerful focus on the subject of the image, some touch-ups might be necessary. Though it is recommended that the settings and props be properly stored and cleaned before each use, sometimes dust or particles are an inevitable result of photography in which products, props or settings are frequently changed. In the case of the image above, a small dust particle is noticeable in the lower left corner. Since the image (not the product) sells, it is important the image be as clean and professional in appearance as possible. Customers don’t want products they perceive to be kept in dirty or dusty environments. 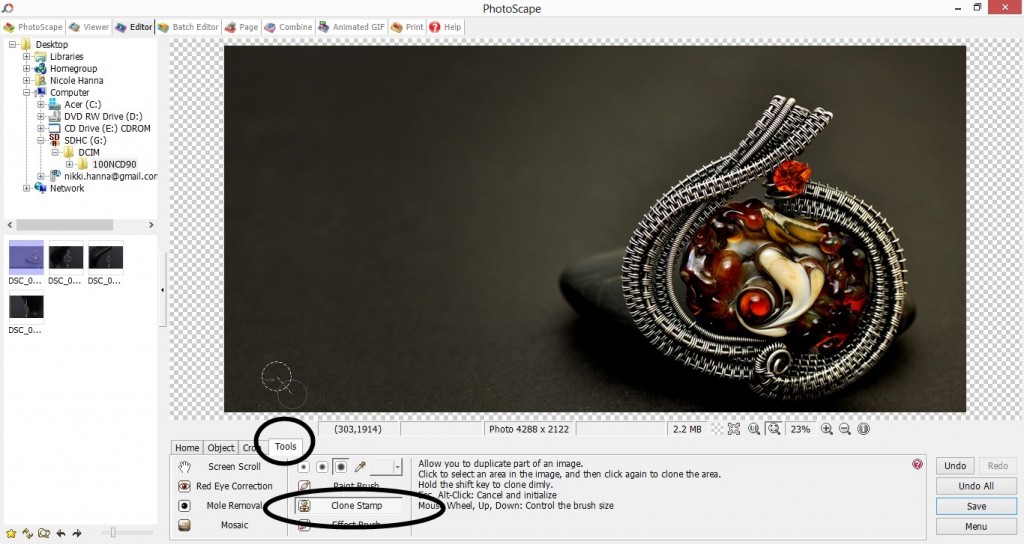 The “Clone Stamp” tool is a perfect function for eliminating elements overlooked in the preparation process. To access this function, click the “Tools” tab located in the horizontal menu bar directly beneath the image. From there, click “Clone Stamp”. Place your cursor over a portion of the image (nearest the imperfection) free of blemish, click, then drag your cursor over the blemish and click. This replaces the blemish with an exact replica of the first click. Again, I stress that special attention should always be paid to the cleanliness of ones settings and props, but unless you live in a vacuum, dust happens. Editing The Image: Watermark & Text 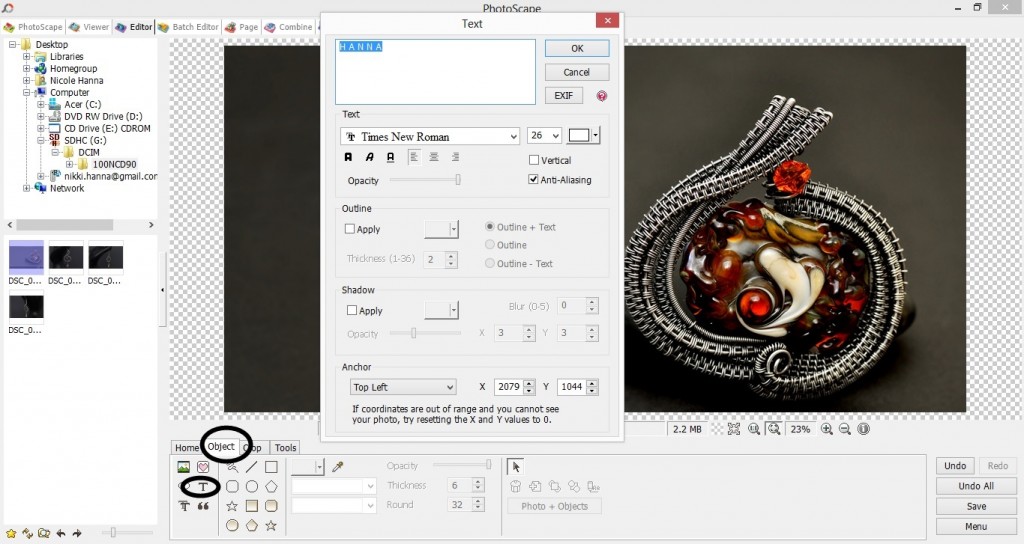 Once the image is edited, I always recommend adding a watermark. In an age of digital sharing, protecting your name, your product and your work is paramount to the continued success of ones business. Pinterest is only one example of social sharing which occasionally (and mostly unknowingly) encourages some form of copyright infringement, so image watermarks are a necessary addition to the photo editing process. With that said, I also suggest keeping the watermarks off the subject of the image, and as unobtrusively placed as possible. After all this hard work, the last thing you want to do is detract from the power of the image with a poorly placed watermark.To add text to an image, click the “Object” tab in the horizontal tool bar directly beneath the image. From there, click the letter “T” to open the text option. The program then allows the user to add text, choose font, size, transparency, then move the text on the image as desired. If your website utilizes a particular font, you can download a similar free font from Dafonts, install on your computer, and this new font will show in the text options of the PhotoScape program. This is a great way to create a sense of consistency in the images as they appear in online galleries. The Finished Image  Further adjustments can be made as necessary, but I find these basic guidelines a great way to create quality images quickly. It should be noted, however, photo editing is not a cure for inadequate photography. It’s important to have a firm understanding of ones equipment, and the process behind creating a strong image in camera. Editing software cannot (and should not) fix blur or noise resultant from user error, improper lighting or inferior equipment, and should be utilized only as a means of emphasizing an already powerful image.Now go forth and take pictures! Conquer, I say! Edit and have fun experimenting with your software. And never…. never… resize an image, post it online and call it a day. Take enough pride in the work involved in creating the product to capture it purposefully and beautifully, and edit accordingly. Your products and business will thank you.Happy Editing!
Nicole Payhip Due to the recent revelations regarding EU Vat tax laws, Payhip is a relatively new player on the field of digital downloads. Store owners with a focus on digital goods, who have discontinued sales to the EU thanks to burdensome tax requirements, have this new (affordable) means by which to deliver digital content. There are no start-up or monthly fees and only a small 5% commission on each sale, and Payhip collects and remit VAT on behalf of its sellers. The tax burden is no longer yours to bear! Their website is user friendly if you are happy with the platform provided. However, there are (limited) options for customizing the appearance of your listings if you have some familiarity with .css code. The interface is very clean and professional and there are no large banners with which to content or detract from ones personal brand. There is, however, no shopping cart and no means by which you can categorize items. If you have less than a dozen digital offerings, this may seem inconsequential, but for those with a large catalog of items, this may prove a burdensome shopping experience for customers. Payhip does, however, promise that a shopping cart is in its near future, though dates promised keep appearing and disappearing without results. And for those with a stand alone website, the lack of categories may not be an insurmountable obstacle. The price is right and, for those who intend to become and remain VAT compliant it is, so far, the best solution I've found. Storenvy Storenvy offers something few other platforms deliver, which marked it, for me, a superior selling option. Though their audience is small, and their marketplace rarely drove traffic, the customization of stores allowed business owners an opportunity to take control of their branding via an affordable platform. This year, Storenvy turned its attention away from their customizable platform, shifting its focus towards its lack-luster marketplace and began charging a 10% commission (plus 3% credit card processing fees) on all sales generated through a Storenvy.com search. These fees were intended to be used in marketing and site improvements, but their business plan was never disclosed to users. The shopping cart and checkout process, specifically when utilizing the custom store front (not to be confused with the checkout system associated with the marketplace) became increasingly riddled with errors regarding which support was, in my experience, entirely dismissive. Customers were easily navigated from a custom store to the marketplace via links conveniently placed during the checkout experience, thus converting custom store sales into marketplace sales, and generating a 10% commission (for those who opted in to the marketplace experience). Storenvy also changed payment processors from PayPal to Stripe and were not entirely transparent during this transition. Though stores open prior to the implementation of Stripe were "grandfathered" in and allowed to continue their use of PayPal, many were confused by the process and ended up with funds from new transactions held in "placeholder" Stripe accounts created on their behalf (and without their permission) by Storenvy. The only way to access these payments were by creating a Stripe account or cancelling the transactions and waiting 21 days for the refunds to process. Though there are different accounts regarding the nature of the confusion encountered by many users, it was my experience that Storenvy handled the situation in an (at best) unprofessional and (at worst) underhanded manner. Stripe is now the default payment processor for new store owners who, I should note, can continue to use their customizable store fronts free of charge, and may opt out of the marketplace and its 10% commission. Because of the unreliability of its checkout, the high commission and corresponding lack of features to justify these fees, and the slow response time and inadequacy of support, I no longer recommend this platform for business owners. However, they do offer a free, customizable store front, which might paint a pretty picture for those testing the waters of branding independent of an online marketplace. Digital Goods Store Another player in the digital downloads game is Digital Goods Store. This platform has a longer history than Payhip, and also handles VAT on behalf of its sellers. The difference is a higher commission of 10%. This commission includes PayPal fees, which are paid by the platform and may, on the surface, seem convenient to many but, in the end, still prove higher than those set forth by Payhip. Their platform is elegant and clean. Creating an account, accessing the dashboard and listing new products are all easy and no fuss. The storefronts are professional but include Digital Goods Store banners, which aren't conducive to business branding, and there are no real noteworthy customizable options. There is no shopping cart, nor ability to categorize, so this platform presents the same complications of Payhip. However, they have suggested they might allow physical products in the future. Should EU Vat laws extend to physical products (which is promised as early as next year), this may be one of the only affordable options for store owners who would like to continue to sell into the EU without the burden of collecting and paying VAT tax. Their fees are reasonable, and the platform is elegant and easy to use, but the lack of categorization and shopping cart is something to consider for those with more than a handful of products. They are currently not accepting new sign-ups while they improve their site to handle the VAT regulations, so some features discussed that were not previously in place may be implemented upon the launch of the new site. e Junkie Quite frankly, the dashboard was such a mess that I gave up attempting to navigate it before I could even successfully set my payment methods and email preferences. Store fronts lack customization with an appearance that is, at best, utilitarian. They have a ridiculous number of pricing plans and none of them include an "unlimited" option. Though it's most expensive option ($100/mo) includes 2000 products, there is still a cap on data storage. I was not impressed enough by anything this platform offered to invest more than a few hours of painful navigation. IndieMade IndieMade is a platform with the heart of an artist. Keeping in mind that this site is a platform and not a marketplace, it's an easy means by which artists can build a brand without the fuss of building a site. Though this isn't the easiest of the "all in one" site building platforms I tested, it has a beautiful, though extremely limited, selection of themes, created for their finesse and elegance. If you are looking for a "buy buy BUY" storefront, with in-your-face sales tactics, this is not the platform for you. All IndieMade themes are customizable with color and font, though I did have some difficulty creating page elements. Because it's interface is so clean, it's sometimes impossible to find what you need! I found that, once I navigated away from my site, it was difficult to determine how, exactly, to access its dashboard and make changes to the theme. The tiered plans are all affordable, but there is a product limit of 300, including both physical and digital goods. All plans include galleries, a blog and individual site pages, as well as a fully functioning shopping cart and store front, but the number of allowable galleries, pages and product shift between plans. Custom domain integration is available on the more expensive plans. If you have the patience to learn the interface, and have less than 300 products, this is a lovely platform to use to build a custom site, but may prove lacking for stores with a large inventory. Squarespace Squarespace is another platform (not a marketplace) with photographers and artists in mind. This all-in-one website solution features everything you need to build a web presence. The dashboard functions in much the same way as Weebly's drag-and-drop interface, but the theme selection is, I feel, too thin. However, because so many elements of the site are customizable, the lack of theme options may not be a hindrance to most, and the theme selection is comprised of elegant and professional templates. Custom domain integration is also a feature they provide. The pricing is comparable to other all-in-one platforms and is inclusive of an unlimited tier at $24/mo. The templates are all mobile-optimized, and responsive, so each theme will resize to fit whatever device from which it is being viewed. This is prime internet real estate for photographers and artists and their images, showcasing their work in the best possible format. The templates all include a full e-commerce solution, offering checkout for physical and digital goods, though the only payment method available is via Stripe. According to their support team, PayPal integration may be on the table in the future. They also offer 24/7 support, which I found to be responsive and informative. Even utilizing their support ticket system, their responses were timely, within 24 hours every time, though usually answered in less than 6 hours. Wordpress For seasoned site builders, WordPress is the be-all, end-all of all-inclusive website options. The hosted version of WordPress comes complete with hundreds of possible, customizable themes, though the level of customization is often limited without a purchased pro template, and even then, the customization is not always easy, nor automatic, and often requires a moderate working relationship with .css and .php code. The dashboard is not as clean as other solutions, but still easy to navigate, and the number of available free and paid plug-ins can convert most themes into individual, representative websites. The free woocommerce e-commerce solution, however, was a nightmare to set-up, was far too bloated for my needs, and tested my patience to the point that I completely dismissed it as a viable option. Pricing depends on hosting options. Through Bluehost, the montly hosting fee was $9.99, with additional fees for SSL certifications, domain privacy and other features. Despite the hidden fees for features you'll find you need, this was still the most affordable of all the stand-alone, all-in-one options, however, was not, by any means, the easiest to use. Weebly Weebly is the last of the all-in-one platform options I tested, and was, ultimately, my favorite. Like Squarepace, Weebly utilized a user-friendly drag-and-drop interface that allows most themes to be easily transformed to fit any personal needs. For those who prefer to avoid the extra customization, however, the number of available "out of the box" themes were plentiful. Though the pricing put this as the most expensive all-in-one web-building option, with the most expensive plan at $29.95/mo (this fee was lowered with yearly and two year payment options), I found it came with the most customization. This plan will accommodate an unlimited number of physical and digital products while maintaining a very no-fuss checkout experience. The themes are (depending upon the plan) all-inclusive, with an unlimited number of pages, galleries or data storage. The starter and business plans include custom domain integration, either with a domain purchased via a third party or through the Weebly platform itself (which is the more expensive of the two options). The business package also offers a custom SSL ticket that keeps customers entirely within the confines of your own site. Otherwise, the shopping cart is (and it's very subtle) moved to a weebly.com SSL secure checkout. I found that support tickets are answered timely, but they do not offer 24/7 phone or live chat support, which may not be preferable for large e-commerce websites. However, the support staff is very friendly and very eager to help. Support tickets are often followed up with other emails to make sure the service was adequate, which I appreciate. Final Thoughts Of the platforms detailed here, only Storenvy offers a marketplace with internal traffic, but the fees, poor support and buggy checkout experience may prove problematic for many. All other e-commerce, branding solutions presented in this article are for platforms, with a focus on branding a stand-alone web presence, and without marketplace solutions.
Though the focus of this review isn't to discuss the necessity for a stand-alone web presence, I strongly encourage these platforms over marketplace solutions, simply for the all-inclusive branding options they provide. If you have any questions regarding the platforms I've reviewed here, or have any platforms you have had personal experience with and would like to discuss, please feel free to leave a comment!
Many of these figures are easy to determine and manipulate, others are slightly more time-consuming to calculate. Materials are fairly self-explanatory. Weigh your metals, price your beads, stones or cabochons individually, calculate promotional and shipping materials if you don’t utilize a separate shipping and handling fee, and add them together. Why (x2)? The cost of metals and materials fluctuate. When I sell an item, I want to cover the cost of materials used, of course, but also cover the probability of inflation in regards to a fluctuating metal market, for instance. Since you cannot always recover the value of scrap materials, this (x2) also satisfies the unfortunate necessity for waste in a handmade market.
Your overhead is any expense required to run a business independent of direct labor and materials. This may include an hourly rate for research, photography or networking, internet, phone, electricity, mortgage (if you work from home), office supplies, selling fees or advertising, to name a few. If you work from home, you cannot rightfully claim your entire monthly mortgage payment as a business expense, since you live where you work, so it’s important to estimate the amount of space you utilize in the home, and how this relates monetarily. For instance, I utilize a tenth of the space in my home for business. My mortgage is $400. I can claim an estimated $40 a month as a business expense. I have cable and internet at home. I would have these services irregardless of my business, but since I work from home, I can claim a portion of my internet costs as a business expense. Not everyone will consider electricity, cable and mortgage as business expenses when working from home, dependent upon labor wages, so crunch the numbers either way and determine your comfort level. I spend a minimum of 10 hours a week at non-chargeable work, such as networking, advertising, photography and research, or any work not directly related to the production of individual goods. I would consider $10 an hour for this work a reasonable salary. This is $100 a week, or $400 a month. Call into account water, electricity, tools and tool maintenance as well. All expenses considered, in this scenario, my overhead is an estimated $500 a month. If I make, on average, 30 pieces a month, my overhead is $15 per piece. So, for the piece pictured above, I used 3 grams of silver-filled wire priced $17 an ounce. This equates to about $1.10 in metal used. The 6mm amethyst is $1.25. That leaves me with $2.35 in materials. Total material costs (x2) is $4.70. So far, my equation is ($4.70 + $15 + labor) x 50% profit margin = product price. Minus labor, this equation is also an accurate representation of wholesale value. Ah, now for the difficult part…. determining the value of your skill. This, for me, was the most difficult to justify and, through the years, has dramatically fluctuated. I used to believe the value of a craft skill set was equatable to the value of, say, a receptionist. I know, right? Completely UNrelatable! Silly me! But, as a result, I was valuing my craft at an hourly rate of $10. It took me years to recognize that a much larger percentage of people are qualified to be a receptionist than those who are qualified to perfect a craft, so my hourly (or labor) rate needs modification to represent the discrepancy in this percentage. If you are still uncomfortable assigning a value to your skill set without accountable justification, you can also calculate hourly rate as: [desired yearly income / work weeks – vacation] / number of direct-labor hours anticipated per week. For instance, I would like to earn an annual salary of $25,000, and plan to work 50 weeks, at 25 hours of direct-labor work a week. [$25,000 / 50 weeks] / 25 hours a week = $20 per hour. Now, for the sake of our model equation above, let’s assume the labor rate is accurately justifiable (which is another post entirely) in relation to the skill involved, and I now value my craft at $20/hr. Assuming the piece above took 30 minutes to make, the equation now reads: ($4.70 + $15 + $10) x 50% profit margin ($29.70) x 50% = $44.55 I recommend rounding up to the nearest dollar, and adding sales tax where applicable. What you will discover, as well, is that the difference between the cost of materials are small in comparison to this piece in silver-filled, copper or sterling. The final cost in copper, following this equation, is only $2 less and the final cost in sterling silver is only about $3 more! As a precious metal, sterling is often marked higher (sometimes as much as 100%) due to its “perceived value”, but the math, for optimal profit and pay, doesn’t require the inflation. And there it is… my secret formula… hopefully made easy! Obviously, not all numbers are serviceable. Some figures are loosely applied. Desired yearly salary, estimated hours of direct and indirect labor, and profit margin are per individual standards, based on any number of extenuating circumstances. And there is still one more point of consideration: the market as a whole. Take the time to research the product price of like items and adjust your numbers accordingly. You want to match market value where possible, without devaluing your own investment and skill in the process. Now you’ve punched in the numbers and you think “Oh my goodness, no one will pay that price!” and there are no examples in your research of market value to justify the final product price. You have one of three choices: (1) determine in what ways you can enhance cost-effectiveness, (2) find another line of work (3) accept that it’s a hobby and create for the sake of creation…. not the expectation of financial gain. Expecting a monetary exchange for a hobby is like saying anyone can be a doctor without paying for an education. Work = gain. Period. The more work, the more gain. It really is as simple as that. If you are a hobbyist, respect that this is a profession to others and price accordingly. Now that you’re as bored reading this as I was writing it, and I may have raised a few hackles with my hobbyist debate, back to your regularly scheduled programs. Though hardly entertaining, it was, I hope, educational. And, as with anything I say or do, take it with a grain of salt. This is one solution to a complicated set of problems, but there are other, perhaps better, solutions. Product pricing is as personal as the process of creation to some, and as mildly irritating as a gnat to others. Find your place, stand your ground and let the opinions of others flow over you like water. Good night and happy weaving! On March 11, 2015
If you’re at all familiar with my blog or my history with Etsy, you’ll know I extend to them no real kindness. In fact, though I’m no longer a seller, my soul withers with every purchase I make using that platform. Pretty soon, I’ll be nothing but a morally ambiguous shell ready to sell my creative spirit for a knitted fox scarf. Sniff. Last fall, Huffington Post posted a remarkably inspiring tale of a stay-at-home mother who raised a million dollar business from the ashes of domesticity, in part, thanks to Etsy and its handcrafted philosophy. But the viral coverage sparked controversy when it was discovered her items were mass produced in India and altered with “lace and buttons” before sale. What was being branded “handmade” was only “hand altered”, and then only just. Etsy has tried desperately, over the years, to maintain its presence as a handcrafted marketplace while encouraging, whether with blatant abandon or not, mass production and big business. And then this happened. Etsy announced, with idealistic corporate glee, their IPO, which means great things for suits and shareholders and much less for the handcrafting sole proprietor. Since public companies are under intense scrutiny to remain profitable and increase profits, this could spell disaster for the micro business while impacting large manufacturers in much smaller ways. Etsy has built its brand on the handcrafted ideology, and then abandoned the artists who popularized it in favor of profit-driven resellers. Suppliers, vintage, mass production are all terms now synonymous with Etsy’s global “handmade” marketplace. Ironically, however, handmade is in short supply. Customers are searching for, and purchasing, what they believe to be handmade goods, often on the backs of real artisans, but not for their benefit. And Etsy clearly understands these self-incriminating moves, having recently changed its “handmade” tagline to “unique goods”. Ahem. Nice move, Etsy. In light of the never-ending string of epic Etsy failures and disappointments, I’ve made the decision to cut the cord. Refusing to maintain an Etsy shop was a personal trial. It pushed me into a series of monumental self-expressive episodes which have improved my selling experience, as a whole. It wasn’t easy, but it was worthwhile. And, as a result, I discovered a world of possibilities for artistic sellers. As such, I will no longer support their hypocritical business model by purchasing via this platform. I know, I know… but what about the honest sellers producing legitimate handcrafted goods? I hear what you’re saying. Etsy is easy. It’s known. It provides internal traffic. Promotions. Advertising. I’ve heard it, and I believed it once myself. And then I left and my business didn’t die, so I can assure you there are other (perhaps more) affordable solutions. And I surprised even myself, in the end. But really, I get it. This isn’t a particularly popular opinion to have when so many hopeful artisans are struggling to maintain a presence in the ever over-populated Etsy marketplace. However, by purchasing products via the Etsy platform, I’m condoning their blatant abuse of artists. And it’s just not worth the guilt! If you get a message from me via Etsy asking for black market sales of your items off site, don’t be surprised. I still want to support you, but not if it means supporting them. Now give me all the knitted fox scarves. All of them! On February 8, 2015
I’m remodeling. And organizing. And cleaning. Nothing is more conducive to creativity than an atmosphere which fosters it, both in style and functionality. I don’t work well in clutter, or mess or dysfunctional furniture or bad lighting. I like to surround myself with comfort and mood and a sense of spiritual calm, and feed my inner interior decorators and professional organizers some expensive carpet-covered symbolic cookies on occasion. Because who doesn’t like curling their bare toes in brand new carpet? So yes, I’m remodeling. I have placed, with extreme purpose, statues and art and candles, I’ve painted and re-arranged furniture. I’ve organized and then organized what I organized. You know, boxes within boxes, the way all proper obsessive compulsive personalities should clean. I’ve even installed a new bath tub with drywall and floors to follow. Carpets are installed next week, so I’m packing things away and donating others and meticulously arranging my clothes by season and color, because I need this order in my life. Order is amazing. Chaos can spark creative thought, but order…. order is the means by which that thought becomes reality. As philosopher Eric Hoffer said “Creativity is the ability to introduce order into the randomness of nature” and, lately, the wild nature of my life has been desperately clinging to whatever vestige of order it can find. The last 10 months have been challenging on several levels, but also incredibly satisfying on many more. There is something to be said for facing difficulty and pushing onward despite it. For gathering up, inside myself, this power to move forward. It seems so small some days, this power, but when it’s needed most, it’s a mammoth of will and positivity. Those are the days when I can say with certainty I am capable of anything and, even if I’m sure to fail, I proceed to try. Try something new. Do it badly. Try something else. Do it worse. Try again and win. Win big, because the satisfying curl of patience and determination around a difficult time makes any accomplishment, no matter how small, seem monumental. But every once in a while, we have to reinvent order, reign in the chaos so this power has room to manifest itself in our lives, and sometimes this requires the recognition of hoarding and the following acceptance of loss, of letting “things” move away from our center so creativity can settle there in its place. Somehow, for me, this translates to a desperate need for tupperware and a label maker. Bring. It. On. Chaos aint got nothing on me. On January 23, 2015
So I admit it. I let tax time get the better of me this year, even though I swore that last January was the only January I would panic. I’ve had three meltdowns this month. Three. In twenty-three days. One of them involved the emotional binge-eating of Snickers and Doritos and the post mortem guilt which followed. There’s nothing quite as emotionally stalling as staring into the abyss of an empty polypropylene chip bag and discovering the barren womb of regret. Damn you, IRS! I broke out into hives. I think I even tried to pass a kidney stone for two weeks in an attempt to avoid reconciling my inventory. My brain wasn’t built for numbers and it’s a cruel government who would force them upon me. But I prevailed. Oh yes. I prevailed! Amidst the crumbs of my self-control, and the donuts… because there are always donuts… I found the last vestiges of my will and crawled from beneath the slowly suffocating cell of spreadsheets. I pulled myself from the icy grip of accounting software, held aloft my mighty pen and declared to the heavens “You shall not win!”. And then, that very night, my tax preparations were complete and there was a mighty tremble and sigh as the beast of bookkeeping settled itself back into its slumber. Then I totally had wine and binge-watched this season of Reign. Seriously, there was a lot of wine. So yeah, taxes are always fun. But hey, they are finished, I’m handling the VATMESS last December unleashed upon me, my kidney stone decided to crawl back into my kidney so, for the time being, my body doesn’t hate me, and I even managed to make a few things. All in all, it’s been difficult, but productive. I’ll blame it on the stars. What will you blame on Mercury in Retrograde? On January 4, 2015
I need a hover board. All the cool kids in 2015 should have a hover board. Though my children would tell me to stop being ridiculous, because all the cool kids obviously have the iPhone 5. And though we aren’t exactly fit for the Back to the Future franchise, I have to say, the world is offering some pretty amazing electronics, inventions and creative prospects and, having reminisced about the last 20 years and the respective evolution of technology and ideas, I’m inspired. So, to 2015 and beyond, because my brain is frothing from my ears with ideas. I can’t sleep. And I can barely stay focused on my tax preparations (hence my total solitude and lack of creative productivity these last three weeks). I need to dip my toes in the pool of creative thought, then dive right in without even holding my nose, because I’m feeling adventurous. This year is my year to take risks, explore possibilities and enjoy the journey. There be dragons in my future. And pendants featuring my photography. Cuff bracelets and woven link bracelets. Hair forks and scarf pins. And a crown. This will be the year of the crown. I am planning many more videos for my YouTube channel, Go Art Yourself, which will feature painting, sketching, clay and, of course, more wire wrapping. And classes. Finally there will be fall classes scheduled, locally, at least. I’ve also planned home improvement projects including new carpets (okay, technically Magic Windows will be completing this project for me), and bathroom, kitchen and garage remodels. I’m going to plant a small potted vegetable garden on my balcony, and try my best not to kill everything. I’m also going to learn cake decorating. Which isn’t a home improvement project, but I didn’t feel it warranted it’s own paragraph. So… yeah. In all, 2015 might prove to be the most fulfilling yet! I hope you’ll stick around to experience it with me. What goals have you planned for the coming year? On December 19, 2014
What a crazy ride this thing is we call life. Sigh. On November 4, I lost my beloved 15 year old Basenji, Ash. Four weeks later, his housemate, Pandora, followed him unexpectedly. It was a crushing blow surrounding the holidays that has left our household in an emotional fog. And because I trust that our hearts are big enough to share, we rescued two kittens, Graham Cracker and Charlie (who are still determining the pecking order, ahem), who now have a forever home in time for Christmas. We love them already and they are slowly filling the hole left by our canine friends. And amidst the roller coaster of grief and joy, memories and moments, I’m greeted one evening with #VATMOSS. What’s that, you say? Why, it’s the boogeyman of micro-business, which has its claws embedded in the meat of every seller and consumer. If you’d like to learn more, you can read a wonderful blog post (from the perspective of a micro-business owner) by Heather-Beads, or a more thorough explanation by Rachel Andrew. I will spare you the detail, but will sum up with the following points:
I can no longer offer digital downloads (temporarily, at least), and all tutorial purchases will be emailed manually. I do this on occasion anyway, so the impact to me and to the customers who have come to depend on the services I provide, are some of the least impacted. However, many creative sellers and artists are simply removing their digital downloads entirely, to avoid the soul-sucking bundle of #VATMESS requirements. Other venues through which I sell my tutorials may also be impacted, though have yet to clarify what their future holds, further limiting (potentially) an affordable option for Nicole Hanna Jewelry tutorials. News will come on that soon, I’m sure. However, I will still sell tutorials here through the “Tutorials” tab in the menu bar, but sadly without the convenience of an immediate electronic transfer. Also, you’ll notice a requirement to enter a physical address for the receipt of all digital goods. This is an unfortunate requirement of the platform through which I sell. However, you should, if business owners are aware of (and compliant of) these new regulations, see this requirement across the board. #EUVAT now requires the collection of data containing two non-conflicting proofs of the buyers location. Intense, right? I hope you can forgive me my inactivity as late. I’ve been trying to find an alternative that didn’t alter your experience as the customer, while still providing affordable lessons, and it’s been quite the journey. As early as 2016, #VATMESS could apply to all products sold, and many micro-businesses will (undoubtedly) close their doors. If you’d like to help make sure this doesn’t happen, please sign this petition to ask lawmakers to suspend this law for the micro-business, sole-proprietor. But, on a positive note, I’m having a Tree of Life pendant giveaway on Instagram. Find me on instagram @nicolehannajewelry to find the giveaway photo. To enter, re-share the photo (using an app such as Regram or simply by capturing a screen shot, saving it to your device and uploading), and tagging me @nicolehannajewelry #nicolehannajewelrygiveaway. Winner will be randomly drawn at 1000 followers, and announced within 24 hours. Thank you for your support and happy weaving! Nicole |
Enjoy my content?
Categories
All
Archives
June 2024
Follow Me!Search My Site!
Feed your creative spirit! Shop now!
|