|
Never. Without the express written permission of the artist, it is never okay to copy their work. And this is not a discussion about the use of tutorials, which all (should) provide their own Terms of Use and permissions. It should be noted, I invite everyone using my tutorials to make and sell those items in any venue or in any number. This is not to discuss the use of individual design elements or techniques in original creative work. This is also not to discuss creative theft with malicious intent, either, but to discuss a persistent, pervasive belief that "I can make that!" means you have any legal right to do so, without permission. Whether for personal use or sale, neither intention negates the act of theft, its consequences or its impact on artists. According to the US Copyright Office, there is no such number or percentage of change expected (often called the woefully inaccurate "change 10%" rule) before a work is considered original, so to copy in any capacity in which you are not granted permission, is to open yourself to possible legal recourse. While I've done extensive research, read the laws, contacted copyright professionals and experts, I encourage everyone to contact the copyright office themselves to clarify these legal guidelines. I had debated this post for weeks. I had considered my words carefully. Too carefully, in fact, because while I was thinking about what to say, I was saying nothing at all, and becoming a victim of my own reactions to the infringement of my creative efforts. I had once made a conscious decision not to police every incident of theft I experienced, else find myself devoting all my creative energy to protecting my creative rights, instead of actually creating. But this is not to say that copyright infringement hasn't left its scars despite my best intentions.  When the conversation of infringement reaches from the shadows of public discourse, I often hear this: "You should consider it a compliment!"
Or: "Don't worry about them. Consider it a challenge to improve your own work." Or (and this is the most troubling of them all): "If you put it on the internet, you have to expect that someone will copy it." And while you may expect it, you do not ever have to accept it. And it is not a compliment. It's an insult to the creative process, to the hours each artist dedicates to improving their skill, creating designs and combining the elements of design into cohesive work that represents their creative soul and spirit. It is an insult to enjoy the work enough to copy it but not enough to purchase it and support the artistic vision of those who created it. I understand these are not the subjects many like to entertain, that there is this belief we should focus on the beauty and art of creation, even at the expense of moral and legal discussion. However, as a victim to infringement more than a dozen times in the last month alone, I am finding it a distraction too constant to ignore. I decided it was important to discuss the impact this theft, no matter how innocent the intent, is to the artist who experiences it.... how painful it is to throw yourself into work, into pushing the boundaries of your talents, and find those efforts disrespected. So what is the message here? Common courtesy. It takes 30 seconds to ask for permission, and even less time to respect the response you receive.
6 Comments
You know what? I'm going to ride this self-empowerment train all the way to the station. And then I'll wave everyone aboard and ride it to the next and the next. Which is just a really convoluted metaphor for "I'm going to do what I love. Period". And to those who say to me (or you, if you've been as unlucky) "When are you going to quit this hobby nonsense and get a real job?" I say that I'm right where I want to be and, more importantly, where I need to be. I imagine, if you are also following your artistic passions, you feel the same. So, now that I've got you all fired up to pull out your paints or your camera or your wire and tools, we are faced with the grind of building a business. I've compiled a list of my posts and articles that might help you create some forward momentum for you, as well as some posts and resources by others that you might find helpful. And if you have any resources to share, please do so in the comments below! Starting A Business Check out my resources for starting a business or building a website. These posts are not all-inclusive and are based on my own personal experience building my home business. I am in no way an expert on entrepreneurial endeavors, and continue to stumble my way through this journey. Hopefully, these posts will help you avoid the same stumbles. Other Resources
And feel free to disregard the things that don't speak to you, your art or your brand as a whole. You aren't required to listen to the advice or opinions of others, and sometimes half the joy is just discovering the journey yourself. I hope the journey for you is a pleasant one!  But seriously... he's paid for his labor too.
Also check out Build A Business: The Basics
I can't say I'm all that well-informed on starting and running a business, perhaps not as it applies to a wide audience. But... I know what's worked for me, keeping in mind what follows is little more than a glorified opinion. I've covered product pricing, product photography, photo editing, selling platforms (and more on selling platforms here) and social media in previous articles, so what I've chosen to talk about here is the general idea that makes a business a business. Before I get started, a small caveat: get all the legal stuff addressed- taxes, licenses (if required by your state), insurance, whatever is necessary which can be found on your local government's websites. They are usually pretty all-inclusive and fairly easy to navigate. And they have staff (usually) that can walk you through any process. As I said in a previous copyright article, if they aren't a government employee, don't take the advice of strangers on the internet as concerns the law. Just ask the appropriate professionals directly. And while product pricing IS important to the overall business model, the most important element of running a business, in my opinion, is branding and marketing. None of the other stuff matters if you don't have any customers, right? Branding and marketing is what brings in your customers. If you are paying for your time, overhead, materials and profit, then what you charge (hourly rate) doesn't matter. What matters is finding the customer who will pay it. In other words, don't price to appease an audience, find the audience who will pay your price. If you are charging $300 for a piece, make sure your branding (photography, packaging, online presence, signage) SHOWS that your pieces are worth that much. Charging $300 and then throwing that piece in a bubble mailer taped up in newspaper isn't doing any business owner any favors. Make sure your branding and marketing is consistent from the piece you make, to the venue on/in which you chose to sell, to the way you present yourself on social media. Consistent photography, consistent marketing materials are very important. Carry color themes across the board, with your social media banners and avitars, packaging and websites. Use the same business name consistently, keep it brand-appropriate and change it only when absolutely positively necessary. Difficult to pronounce or spell might signify a necessary change. Social media is SO important. Don't rely only on Facebook. You need Facebook, Twitter, Google +, LinkedIn, Instagram, Pinterest, Reddit, a personal blog, and you can't post the same things on each of them. Post different material on each social media platform then link out to other platforms or your website. Your particular audience may not be on all of those platforms, but you have to use them for a while first to determine if that's the case. Learn SEO and use it ALL the time. Chose your words carefully when you post for sale, on your website or social media to assure you are creating the best online presence for yourself possible in Google search. Use a program like Google Analytics (some all-inclusive websites like Weebly may already include something similar), which will detail the source of your incoming traffic. Vary your posts on social media. Your posts shouldn't be sell sell sell. You aren't selling materials or mass produced items. You are selling art. You are an artist. You should present yourself as such and make the transaction about a personal connection and not moving product. Talk to people. Converse with them. If you don't love doing that, I can tell you that making a living at this will be impossible in today's market. The market is incredibly saturated. I wont sugar coat it. It's so saturated that only the people who devote all their time to making it a business will actually make it a business. No platform, no matter what they promise, will make sales happen for you. In my experience, it definitely IS a gamble. I hear people say they work full time jobs and don't have time to promote themselves. So it's a risk. You have to make that time, even if it means losing hours or money at a conventional job. You have to take that risk. If you don't believe in yourself, and invest in yourself with time and money, no one else is going to want to either. Make product no one else is making and do it better than anyone else could possibly do it. Even if that's not really the case, BELIEVE that it's the case, because if you believe it, you'll market yourself as if you believe it, and the audience will believe it. This is what branding is all about: your belief in yourself and how you chose to present that to others. And, finally, good luck and happy weaving! Nicole As a writer, a wire wrapper, or artistic personality, in general, learning to comment critically and accept a critical analysis of my work has always been a very integral part of my creative growth. AllPoetry is an online forum for sharing poetry and fiction, and was one of the first (and most prominent) fixtures in my online experience sharing work with a wider audience, and an incredible learning opportunity, both in commenting critically and accepting critical comments, but also an opportunity to learn to differentiate between a critical comment and a personal attack. Artists almost always encompass their work, on very fundamental levels. When we create, we imbue in our creativity a piece of ourselves, a little slice of our soul, so when we put that work to the world and praises aren't immediately raining down upon us, there's a sting in that which sometimes overshadows the opportunity these situations present... an opportunity to understand our audience, our product, our art, artistic trends and personal tastes. So I'd like to take this opportunity to discuss the "art" of critical commenting, how to offer a critical comment and, more importantly, how to be receptive to a critical comment. COMMENTING CRITICALLY First, it's important to understand what, exactly, a critical comment is and is not.
A few months ago, I posted to social media a wire wrapped pendant to which I added an olive green knotted paracord necklace. The reaction was, not surprisingly, quite mixed, because the two mediums are vastly contradictory. I encouraged critical comments, and received some that were very thoughtful and thought-provoking, and some that were really just empty "attacks" by the handful who had an (apparent) violent aesthetic reaction to the combination of materials, and some that were "fillers" who had nothing critical to contribute. The following is a (fictional) example of the type of negative comments I received, and exactly what not to do when commenting critically: "I don't like the green. You should have gone with a black or white. And it's just too big." Is there a reason you didn't like the green? Why would you have preferred black or white? Though an opinion was offered, there was nothing to substantiate it beyond his or her own tastes. This is what I like to refer to as the "unhelpful helper". They might actually believe their comment offers something to the discussion, or helps the artist improve, but in reality, they've not offered any solutions. The following is a re-creation of the comment above, but written critically: "I find there isn't enough green in the stone or focal itself to support the color of the cord. There are pinks and peach in the stone, and the wire is copper, so perhaps a red cord would accent the tones already present. Black and white are always neutral color choices that might also frame the wire work in a complimentary manner. The knot work is large and intricate and seems to over-power the detailed wire weaving, so cord in a smaller diameter might allow the viewer to experience each element in the design as part of a whole, and not in spite of each other." See how this comment offers solutions? It focuses on a flaw, or perceived flaw, or opportunity for improvement, and then offers a fix, while distancing itself from an emotional reaction to the piece, or from an emotional interaction with the artist. Some art is meant to incite an emotional response, and distancing oneself from an emotional comment is difficult. Let's say someone posted a black and white painting they completed, of a sobbing woman. The strokes are heavy, the outline is abstract, the features are distorted. And you think "This is depressing!" Commenting as such is, however, not productive. Not for you, as you experience the work, and not for the artist. It is fine to express your emotional reaction, but only in the context of the elements of the work. Instead of "This is depressing!", a critical comment might say "The heavy strokes evoke a burdensome feeling of oppression. The distorted facial features symbolize, to me, a lack of acceptance, thus inspiring a sense of despair and sadness. The hunched and sobbing form totally encompass the spirit of depression, but I feel a touch of color, a soft skin tone perhaps, might have involved me more in the work, since the black and white appear so stark and offending and separate me from the subject". I like to think of it this way: If a critical comment evolves into a discussion, then you've commented well. Taking the time to have a reaction to the art, and to analyze that reaction, is just as important to you as it is to the artist whose work you are viewing. You'll find that taking an objective look at the work of others often helps improve your own artistic endeavors. RECEIVING CRITICAL COMMENTS Just as it's important to understand how to comment critically, it's equally important to receive critical comments as intended. I remember once, when commenting on a poem I'd read, I discussed the rhyming form utilized, how the meter was inconsistent and how removing a word from a line would create a stronger flow, and the response I received was immediately defensive: "Well if you don't like rhyme, don't read it!" The author posted it in a contest called "Critical Comments" and specifically noted he or she would prefer honest critique. I call this "projection", when we think we want a critical comment, but really we want readers or viewers to validate our own opinions. Now if we're creating art only for the sake of creating art, our own opinions are the only ones that matter. But if you are creating art for an audience, or a customer, then we can utilize critical comments to understand our target audience, and to improve on the relationships we build with our audience, via our art. In which case, it's important to separate the comments we receive from our own experience with our art. Though some comments are intended to upset, to express discord or are attempts to help without an adequate understanding of tact, having the appropriate reaction to the comments, as the comments were intended to be received, is always a helpful tool in furthering ones art. If we can approach our comments in a responsible manner, using words and phrases that specifically distance our reaction to a piece from the artist who created it, if we can comment by utilizing technical terms, by addressing each element of the work, systematically, we can also learn to READ these types of comments as we receive them. The lesson here is that learning the art of commenting critically, allows you to identify and receive a critical comment. I recommend joining forums or groups which utilize this tactic, offering critical comments on established members, practicing the analysis of the work and your reaction to the work, and then putting your art out there to receive the commentary in return. Keeping in mind, of course, that a negative comment without a critical element is simply the signature of a bully. And that, my friends, is another post entirely.
Though some consideration needs to be given towards the photographic equipment used, the goal of producing a great image doesn’t stop with ones camera, setting or props. Unless every condition is ideal, most images will need to be processed through editing software. This article will discuss types of software, and the editing process used to finalize images for product photography. Choosing a Photo Editing Program There are many photo editing programs on the market, though most provide far more options than a product business owner will ever need. My advice: if you aren’t educated in graphic design, skip Photoshop and settle for a simpler Adobe product. Lightroom 3 is a good alternative, currently available for as little as $60, and is more user friendly than the entire Photoshop suite or Lightroom 4. It has just been announced, however, new Adobe products will no longer be available for purchase but only accessible with a monthly leasing option. Four free options are Serif Photo Plus, Picasa, Gimp and PhotoScape. Serif is a highly praised free program, recommended for the prosumer, with some features similar to Lightroom. It requires an account to download and the process prompts the user to install an unnecessary tool bar, but may be acceptable for a quality free program. Not available for Windows 8 users. Picasa is an acceptable free program, but better suited to editing family photos for fun, and less suited to professional imagery. The options are preset or otherwise incredibly limited, allowing less user control than is necessary for quality images. Gimp is advanced shareware, with a range of options similar to Photoshop, best used for photo manipulation than for editing. The program is “space heavy” on ones hard drive, making functionality on small devices such as tablets and netbooks almost impossible, and requires a considerable learning curve to master. For the purposes of this article, the focus will be on PhotoScape, which provides the most options for product image editing, while requiring minimal experience. It should be noted, according to Digital Trends: “PhotoScape software is free to download. But it’s part of the Open Candy network, and runs ads for other “recommended” software. This is isolated to PhotoScape, and won’t infiltrate the rest of your computer with adware….”. I have used PhotoScape for years and have never had issue with my virus detection software or computer as a result of this product download. However, I recommend avoiding CNET for your download, since malware has been associated with that particular source. Always download programs only after thorough review of the source. Editing The Image: Crop  CROP ONLY AS NECESSARY! Note: In writing this article, I’ve used this banner image for reference. My camera has a maximum image size of 4288 x 2848. For the purposes of posting product images online, and for the sake of saving space, most images will need to be resized and/or cropped, but keep it reasonable or you risk degrading the quality of your image. If your website is image-heavy, file sizes of 1000 pixels or less is recommended. You can crop images to any size or dimensions you wish using the “Crop” tab on PhotoScape, located in the horizontal tool bar to the right of your image files source. Because I knew I was creating an image wider than it would be tall, there are portions both to the top and bottom of the “focal” that should be cropped. Though it is optimal to get your image centered properly in camera, to avoid image degradation during the editing process, web design does not always allow for the utilization of the original image size and shape. 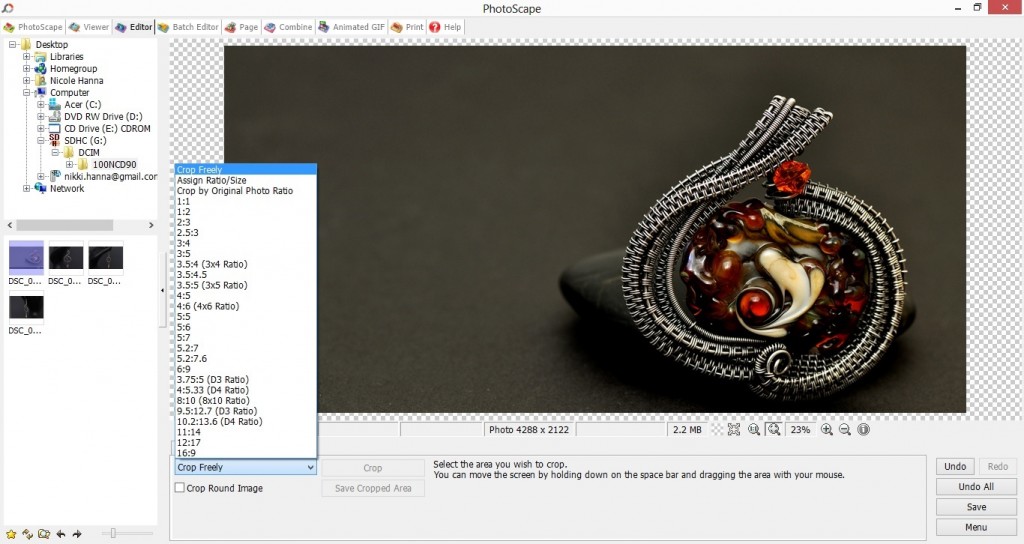 Above is what the crop function would look like in-program. The options include assigning ones own ration/size, crop freely, or use a preset ratio. Editing The Image: Color  You may note the temperature of this cropped image is cool, with a blue tone. This is the temperature of the image as it appears, transferred directly from the camera. Though every camera offers the option to adjust temperature controls internally, per the light source used, this setting will need to be adjusted with every product. The reason: The camera reads light and color based on the product, setting and props. If any of these three properties change, the temperature will need to be adjusted. Though many cameras can adjust automatically, the subject, setting or props can still be misinterpreted by the machinery and is better dealt with in post-processing. 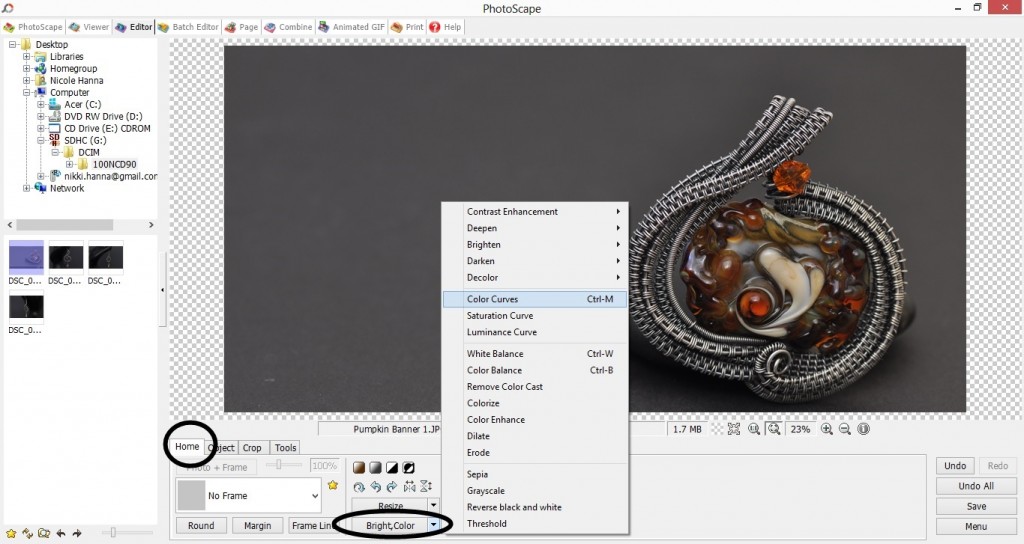 To adjust the temperature, I suggest avoiding the “Color Balance”, “White Balance” or any temperature controls directly and manually adjust your colors via the “Color Curves” option located by clicking the arrow next to “Bright, Color”. Once “Color Curves” is accessed, the blue, yellow and red tones can be adjusted individually. In this case, decreasing the blue tones, or increasing the red and yellow tones will procure a more natural image. For images more yellow or red in tone, the opposite will be true. Editing The Image: Contrast, Depth & Brightness  After reducing the blue tones and matching the gray background more appropriately, it is time to adjust contrast, depth and brightness of the image to showcase its colors, and emphasize the attention to detail. The image, as shown above, though acceptable for casual photo sharing, isn’t effective as a marketing or sales tool, with flat colors and uninspiring setting. In order to best promote the product, the image needs to pop with a focus on its intended subject. 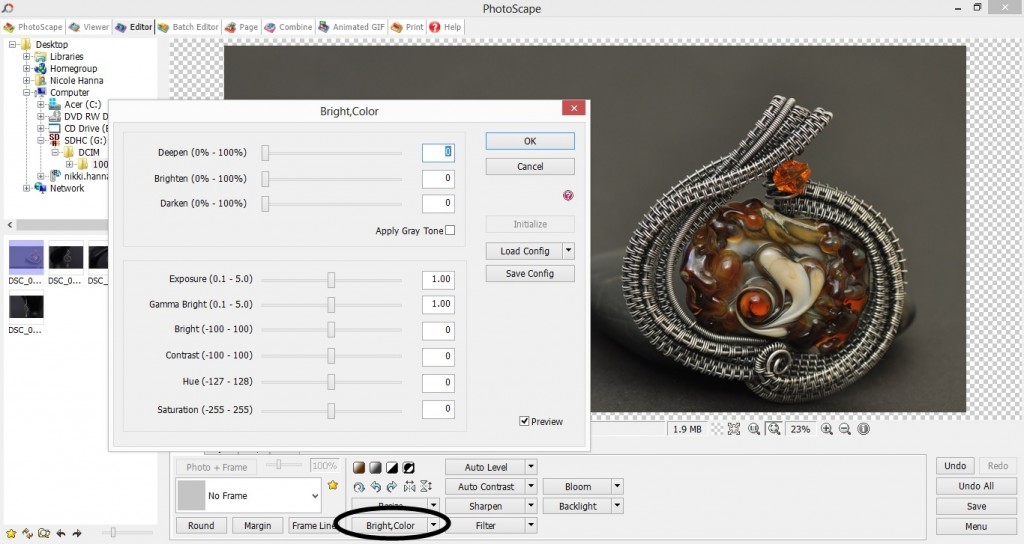 To access the Contrast, Depth and Brightness functions, locate the “Bright, Color” tab and click. Please note, you are not clicking the arrow in this case, as in when accessing the “Color Curves”. Contrast is, for me, the most important function and the one I most highly recommend. This option will emphasize powerful colors, or create power where non otherwise existed. This will also allow whites to whiten and blacks to darken, creating a separation between the subject and its background. This function will, however, darken the image as a whole, which might later need to be adjusted utilizing the Brightness scale. Depth is also a great tool in establishing a separation between the subject and its background and can be used in conjunction with the Contrast scale, or independent of it. Editing The Image: Region Brightness and Blur  Comparatively to the previous image, this version is much stronger, with prominent colors and detail. There is now a clear definition between the subject and its background which can be further emphasized utilizing the “Region” option, allowing the user to emphasize or affect select sections of the image while the rest of the image remains untouched. 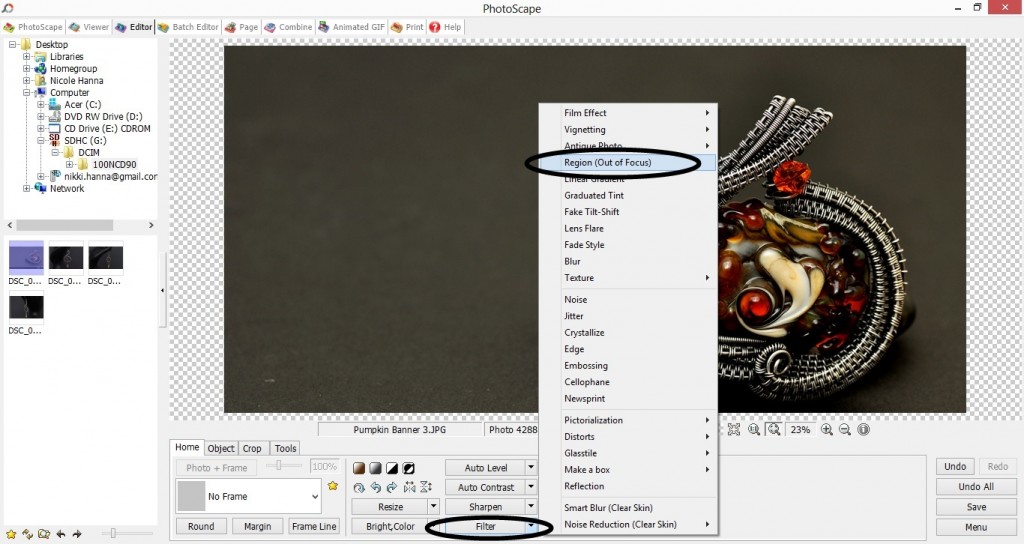 The “Region (Out of focus)” tab is located in the “Filter” option, directly to the right of the “Bright,Color” tab. 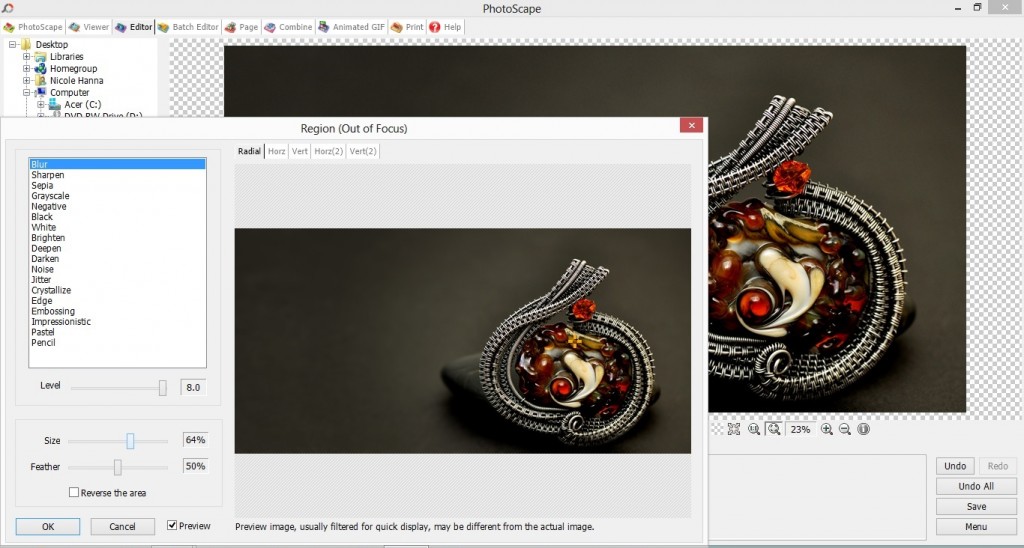 The “Region” function allows the user to brighten the subject itself, with a feathered or sharp edge, blur the background so the focus remains on the subject, change tone, color or depth. Though options such as creating a pencil, painted or embossed effect are available, these are not recommended for product photography. I suggest utilizing these options sparingly and in moderation. Sharp color edges, vignettes or blurred backgrounds often prove a greater distraction than not. Editing The Image: Clone Stamp  After creating a powerful focus on the subject of the image, some touch-ups might be necessary. Though it is recommended that the settings and props be properly stored and cleaned before each use, sometimes dust or particles are an inevitable result of photography in which products, props or settings are frequently changed. In the case of the image above, a small dust particle is noticeable in the lower left corner. Since the image (not the product) sells, it is important the image be as clean and professional in appearance as possible. Customers don’t want products they perceive to be kept in dirty or dusty environments. 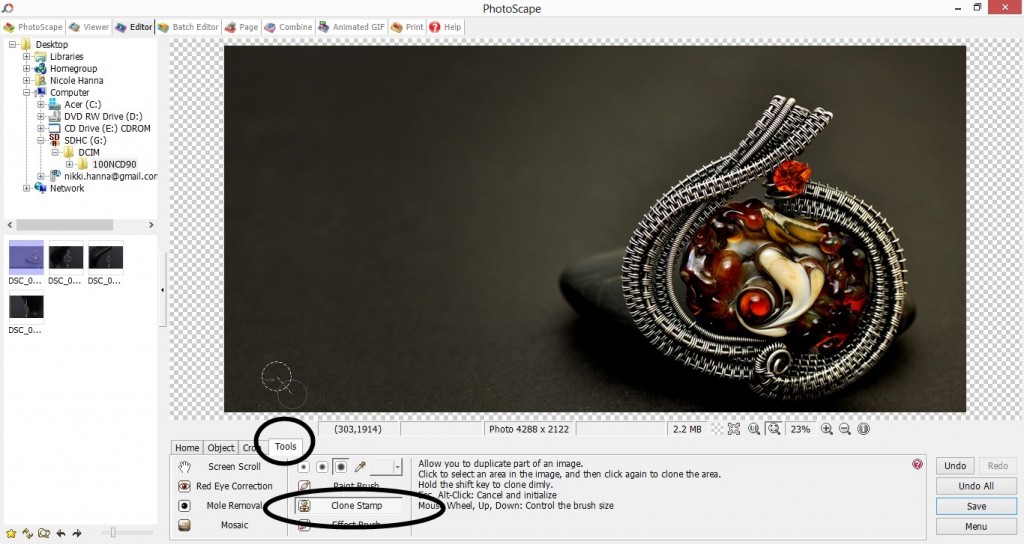 The “Clone Stamp” tool is a perfect function for eliminating elements overlooked in the preparation process. To access this function, click the “Tools” tab located in the horizontal menu bar directly beneath the image. From there, click “Clone Stamp”. Place your cursor over a portion of the image (nearest the imperfection) free of blemish, click, then drag your cursor over the blemish and click. This replaces the blemish with an exact replica of the first click. Again, I stress that special attention should always be paid to the cleanliness of ones settings and props, but unless you live in a vacuum, dust happens. Editing The Image: Watermark & Text 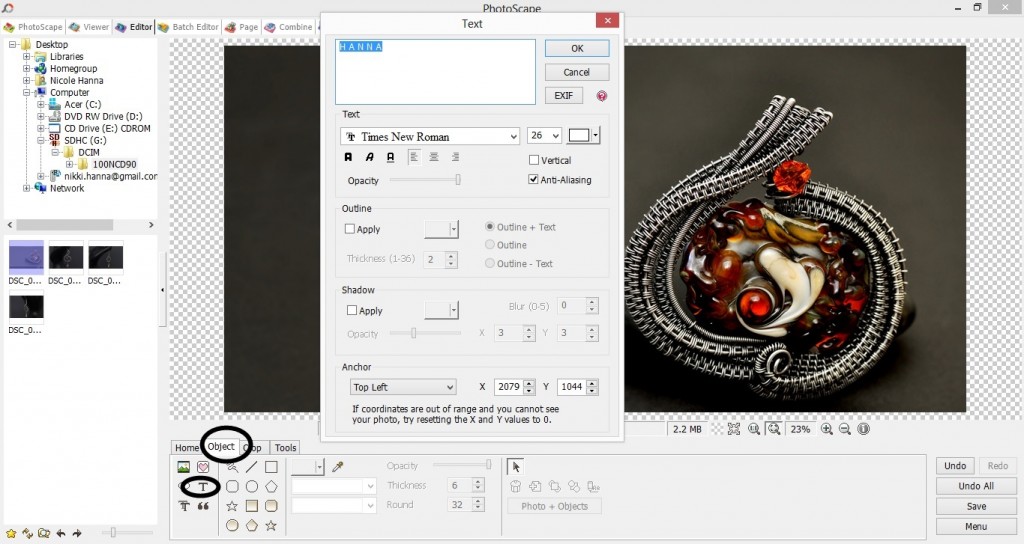 Once the image is edited, I always recommend adding a watermark. In an age of digital sharing, protecting your name, your product and your work is paramount to the continued success of ones business. Pinterest is only one example of social sharing which occasionally (and mostly unknowingly) encourages some form of copyright infringement, so image watermarks are a necessary addition to the photo editing process. With that said, I also suggest keeping the watermarks off the subject of the image, and as unobtrusively placed as possible. After all this hard work, the last thing you want to do is detract from the power of the image with a poorly placed watermark.To add text to an image, click the “Object” tab in the horizontal tool bar directly beneath the image. From there, click the letter “T” to open the text option. The program then allows the user to add text, choose font, size, transparency, then move the text on the image as desired. If your website utilizes a particular font, you can download a similar free font from Dafonts, install on your computer, and this new font will show in the text options of the PhotoScape program. This is a great way to create a sense of consistency in the images as they appear in online galleries. The Finished Image  Further adjustments can be made as necessary, but I find these basic guidelines a great way to create quality images quickly. It should be noted, however, photo editing is not a cure for inadequate photography. It’s important to have a firm understanding of ones equipment, and the process behind creating a strong image in camera. Editing software cannot (and should not) fix blur or noise resultant from user error, improper lighting or inferior equipment, and should be utilized only as a means of emphasizing an already powerful image.Now go forth and take pictures! Conquer, I say! Edit and have fun experimenting with your software. And never…. never… resize an image, post it online and call it a day. Take enough pride in the work involved in creating the product to capture it purposefully and beautifully, and edit accordingly. Your products and business will thank you.Happy Editing!
Nicole
Many of these figures are easy to determine and manipulate, others are slightly more time-consuming to calculate. Materials are fairly self-explanatory. Weigh your metals, price your beads, stones or cabochons individually, calculate promotional and shipping materials if you don’t utilize a separate shipping and handling fee, and add them together. Why (x2)? The cost of metals and materials fluctuate. When I sell an item, I want to cover the cost of materials used, of course, but also cover the probability of inflation in regards to a fluctuating metal market, for instance. Since you cannot always recover the value of scrap materials, this (x2) also satisfies the unfortunate necessity for waste in a handmade market.
Your overhead is any expense required to run a business independent of direct labor and materials. This may include an hourly rate for research, photography or networking, internet, phone, electricity, mortgage (if you work from home), office supplies, selling fees or advertising, to name a few. If you work from home, you cannot rightfully claim your entire monthly mortgage payment as a business expense, since you live where you work, so it’s important to estimate the amount of space you utilize in the home, and how this relates monetarily. For instance, I utilize a tenth of the space in my home for business. My mortgage is $400. I can claim an estimated $40 a month as a business expense. I have cable and internet at home. I would have these services irregardless of my business, but since I work from home, I can claim a portion of my internet costs as a business expense. Not everyone will consider electricity, cable and mortgage as business expenses when working from home, dependent upon labor wages, so crunch the numbers either way and determine your comfort level. I spend a minimum of 10 hours a week at non-chargeable work, such as networking, advertising, photography and research, or any work not directly related to the production of individual goods. I would consider $10 an hour for this work a reasonable salary. This is $100 a week, or $400 a month. Call into account water, electricity, tools and tool maintenance as well. All expenses considered, in this scenario, my overhead is an estimated $500 a month. If I make, on average, 30 pieces a month, my overhead is $15 per piece. So, for the piece pictured above, I used 3 grams of silver-filled wire priced $17 an ounce. This equates to about $1.10 in metal used. The 6mm amethyst is $1.25. That leaves me with $2.35 in materials. Total material costs (x2) is $4.70. So far, my equation is ($4.70 + $15 + labor) x 50% profit margin = product price. Minus labor, this equation is also an accurate representation of wholesale value. Ah, now for the difficult part…. determining the value of your skill. This, for me, was the most difficult to justify and, through the years, has dramatically fluctuated. I used to believe the value of a craft skill set was equatable to the value of, say, a receptionist. I know, right? Completely UNrelatable! Silly me! But, as a result, I was valuing my craft at an hourly rate of $10. It took me years to recognize that a much larger percentage of people are qualified to be a receptionist than those who are qualified to perfect a craft, so my hourly (or labor) rate needs modification to represent the discrepancy in this percentage. If you are still uncomfortable assigning a value to your skill set without accountable justification, you can also calculate hourly rate as: [desired yearly income / work weeks – vacation] / number of direct-labor hours anticipated per week. For instance, I would like to earn an annual salary of $25,000, and plan to work 50 weeks, at 25 hours of direct-labor work a week. [$25,000 / 50 weeks] / 25 hours a week = $20 per hour. Now, for the sake of our model equation above, let’s assume the labor rate is accurately justifiable (which is another post entirely) in relation to the skill involved, and I now value my craft at $20/hr. Assuming the piece above took 30 minutes to make, the equation now reads: ($4.70 + $15 + $10) x 50% profit margin ($29.70) x 50% = $44.55 I recommend rounding up to the nearest dollar, and adding sales tax where applicable. What you will discover, as well, is that the difference between the cost of materials are small in comparison to this piece in silver-filled, copper or sterling. The final cost in copper, following this equation, is only $2 less and the final cost in sterling silver is only about $3 more! As a precious metal, sterling is often marked higher (sometimes as much as 100%) due to its “perceived value”, but the math, for optimal profit and pay, doesn’t require the inflation. And there it is… my secret formula… hopefully made easy! Obviously, not all numbers are serviceable. Some figures are loosely applied. Desired yearly salary, estimated hours of direct and indirect labor, and profit margin are per individual standards, based on any number of extenuating circumstances. And there is still one more point of consideration: the market as a whole. Take the time to research the product price of like items and adjust your numbers accordingly. You want to match market value where possible, without devaluing your own investment and skill in the process. Now you’ve punched in the numbers and you think “Oh my goodness, no one will pay that price!” and there are no examples in your research of market value to justify the final product price. You have one of three choices: (1) determine in what ways you can enhance cost-effectiveness, (2) find another line of work (3) accept that it’s a hobby and create for the sake of creation…. not the expectation of financial gain. Expecting a monetary exchange for a hobby is like saying anyone can be a doctor without paying for an education. Work = gain. Period. The more work, the more gain. It really is as simple as that. If you are a hobbyist, respect that this is a profession to others and price accordingly. Now that you’re as bored reading this as I was writing it, and I may have raised a few hackles with my hobbyist debate, back to your regularly scheduled programs. Though hardly entertaining, it was, I hope, educational. And, as with anything I say or do, take it with a grain of salt. This is one solution to a complicated set of problems, but there are other, perhaps better, solutions. Product pricing is as personal as the process of creation to some, and as mildly irritating as a gnat to others. Find your place, stand your ground and let the opinions of others flow over you like water. Good night and happy weaving! On August 19, 2014
Creating, sharing a hobby or running a business in the age of electronic media is a delicate matter, both for the artist and for those viewing or sharing his or her work. It’s important to credit designers and artists for their hard work and talents, while also expressing a love for art and creativity, in general, and promoting an atmosphere of sharing, in which creativity is fostered in others. Social media is an excellent means by which to spread inspiration, with a far-reaching audience, including an endless array of interests and talents. This massive collection of creative individuals, however, also results in its own set of complications, so I’ve compiled a list of what has been, in my experience, the do’s and don’ts of social sharing. Please feel free to discuss these points or add your own in the comments below. In general: DO always credit your source. If you find an image online and would like to share it, do so from the source, by linking. Links to an artists website or store front help the artist improve Google search ranking. Always make an effort to name designers or stores or brands, when sharing their products. DO always credit the design to its designer. If you’ve purchased a tutorial, and made a product or piece from those instructions, even if deviating from the design, it’s polite (important even) to always credit the designer wherever and whenever your item is posted online. The same piece can be posted on five social networking sites, and the design should be credited in each instance. This helps spread awareness of the designer, which allows him or her to continue to provide quality lessons. When design credit is not listed, the cycle of sharing is broken. DO NOT download the images or artwork of others to your own hard drive, mobile or electronic device. Often, when this habit is perpetuated, design credit is lost, and the image is re-circulated online without a proper source. This cheats the designer and the customer, who might wish to search for other work. Link, link, link, and share from the source. Bookmark the page or image and save a file of those bookmarks for future reference. DO NOT edit the images or artwork of others, without permission from the artist or owner (unless when using free-use images). Memes… I’m looking at you! You know that beautiful photo of a tiny puppy in a tea cup? You know how that might make you want to edit the phrase “If I fits, I sits” all over that image? Please don’t, and I’ll tell you why. Photographers can spend hours finding the perfect location, scouting the perfect models, editing the 129 images of the same scene to find the perfect, holy grail of shots. Painters spend days building a scene on their canvas, and an equally labor-intensive time photographing and editing images of their work. Essentially, by editing phrases or poetry over the images of others, regardless of intent or charm or sentimental value, you are defacing their work. Please respect the time and talents of artists and photographers and request permission to alter the image. DO NOT get upset when conversation is not reciprocated. At a cocktail party, it’s generally considered rude to walk away from a person who began a conversation with you, but when 97 people also began a conversation with you, I think it’s safe to assume it’s an oversight. Pinterest DO NOT pin a product to your Do It Yourself or DIY board, unless the product or design is clearly intended for use by others. Posting a product or image online is not equivalent to “fair use”. and most products are intended to be purchased ready-to-use, not pinned as ready-to-make. For the sake of etiquette, rename your DIY boards as “Inspiration Boards”, instead, and draw creativity from the source, but do not mimic the source, unless so intended by the creator. DO personalize the description on all pins. You can do this from laptops, desktops and mobile device apps. When an item is re-pinned, the description with it (from the previous or original pinner) carries over to the current pin. For instance, I pinned an image of a beautiful photograph without having realized the description read “I’m totally going to remove the watermark, print it myself and hang this in my room!” So… theft, essentially. And there was no indication the description wasn’t my own! So read pin descriptions carefully and edit accordingly. More importantly, research the source, and edit to reference it. Facebook DO NOT tag indiscriminately. Make sure the tag is relevant to the person being tagged. Sarah may love wire wrap jewelry, but that doesn’t necessarily mean she wants to be tagged in every photo of jewelry I post, despite my (ahem….often self-congratulatory) pride. Even in the ether of the internet, personal space is still a commodity closely held by many, and it’s important to respect the idea of space and, just as important, time. Often, with hundreds of likes per user, news feeds and the notification tabs are busy enough with posts and pages the user chose to see (and some Facebook chooses the user to see!), so an additional influx of tagged notifications can be frustrating. DO NOT request “likes for likes”, unless where there is a thread or forum specifically for this purpose. I know, it seems like sometimes it’s easy to get lost in the crowd, and the best way to build an audience is to farm for likes. But likes given only under the prerequisite of reciprocation do neither the giver nor the receiver any good. And here’s why…. traffic to and from Facebook business pages is decided on two main factors: the content of a page, and the genuine interaction it receives. Though a “like for likes” campaign may generate followers, it does not generate fans or traffic. It’s important to build these relationships naturally and genuinely and to like pages and products, in your opinion, deserving of it. DO NOT spam the business pages of others. I promise there are a whole collective of page owners who have done it, and most without a nefarious bone in their body. Somewhere along the line, just past the building-a-business starting gate, we’ve trolled the active business pages of others, dropping a link to our website or Facebook page, hoping for a boost to our numbers. It happens. But, like the previous suggestion, this doesn’t generate genuine interaction and, in some cases, can even get you banned by users, which is a sad happenstance that benefits no one. DO engage with pages, artists and businesses you’ve liked. The more you engage, the more informed you’ll be on new updates. Though clicking that “like” button is a fabulous way to express support for an idea, sentiment or project, conversing about it is even better, and will guarantee posts from the page continue to appear in your feed. DO (as previously mentioned) always credit designers, in every instance when applicable, even in cases of derivative or “inspired by” looks. Twitter Quite frankly, Twitter and Tumbler confound me. Just… um… don’t get upset when I fail to reply to your tweet. Because I don’t know how. It’s shameful, I know. I should really learn to Twitter better. But if you have Twitter etiquette, please share it below! Now, I know social media can be overwhelming. Many juggle a dozen social platforms a day, and do so swimmingly. Some, however (myself included), sometimes feel as though they’ve been dropped in a foreign country with a translate app that’s failed to work. Eeep! But despite the confusion, social media and social sharing can be a fun and beneficial experience. Excuse yourself the mistakes, and aim to fix them. It’s the best any of us can do! Happy weaving! Nicole On January 17, 2014
Do not fear the Liver of Sulfur. I repeat: do not fear the Liver of Sulfur! Oxidization is a science experiment for metal addicts and can prove entertaining, challenging and inspiring all wrapped up in the guise of jewelry fun, creating an antique look to modern art jewelry. And you know what? It’s easy to fix if you don’t like it, so the only thing left to do is enjoy yourself and prepare to take your jewelry or metal work to a defining new level with a product both easy to master and essential for the antique look popular in the metal work and jewelry worlds. Settle in and enjoy! Materials Needed
Let’s Get Started First begin by preparing a neutralizing bath for pieces dipped in the Liver of Sulfur solution. This will prevent the oxidizing process from continuing once the piece has reached the desired color. In the second bowl, pour a cup of lukewarm water. Into the water, stir two tablespoons of baking soda, until dissolved, and set aside. Next, it is important to clean your jewelry items before oxidizing. Oils from the skin can lay a film over metal to which the Liver of Sulfur solution cannot adhere, causing uneven discoloration. To prevent this, add a few drops of dish-washing liquid to a third bowl, fill with hot water and swish the jewelry many times. Rinse beneath a tap as the water turns from lukewarm to hot. Wearing gloves during this process will help prevent new prints from marking the jewelry once clean. Note: Using hot tap water during this process helps warm delicate stones gradually, which are otherwise susceptible to sudden temperature changes. However, with that said, I caution against using hot water on very delicate stones such as opals. Now it’s time to oxidize! In the primary glass bowl, pour one cup of hot water. This water should be steaming, but pre-boil. I find water through a clean coffee pot is the perfect temperature for oxidizing. In lieu of a coffee pot, microwave the water for one minute. Dip the tip of a disposable plastic spoon into your Liver of Sulfur gel to collect a few drops. It has a thick consistency and a sufficient amount of gel will stick to the spoon tip without the need to scoop. If your gel comes in a container that administers the product in drops, use two or three drops to start. This may be added to as necessary. Stir the gel into the water until it turns a vibrant yellow, but still transparent. If the water is pale, add another drop. Since the Liver of Sulfur solution works best in hot water, do not wait once the solution is prepared. Using the spoon with which the solution was stirred, add the jewelry items. If the water is hot enough, the metal should immediately begin to turn dark. The metal will oxidize in stages, often presenting themselves in colors: usually green, brown, blue then black. The metals may be removed at any time during this process if it has reached the desired color, though I recommend black for optimal results. Once your jewelry or metal items have reached the desired color, use the previously mentioned spoon to remove the item from the solution. Drop the jewelry or metal items gently into the neutralizing bath, and let sit for a few minutes. Remove your jewelry or metal items from the neutralizing bath. At this point, they are safe to handle without gloves or spoon. Turn the tap on lukewarm and rinse your jewelry or metal items. While the water runs, begin to scrub the metal with a fine steel wool pad (readily available at hardware stores), careful of any delicate stones. By scrubbing with a steel wool pad, the oxidization is removed from raised surfaces, which are then emphasized by the oxidization left in the crevices. This is a time-consuming process, due to the special attention needed on cracks, crevices or folds of heavily woven or worked metal jewelry. Fine steel wool will often leave fibers imbedded in these crevices, which can easily be removed by gently brushing the piece with a soft-bristle toothbrush dedicated for jewelry or metal work. Pat the piece dry as thoroughly possible, and allow to air dry completely before storing. And that’s it. The steps seem plentiful and sometimes complicated, but once you organize your own system, the entire process can move along in a handful of minutes. You can dispose of the neutralizing bath and soapy wash water down a sink drain, but the Liver of Sulfur solution needs more care in its disposal. Because of its toxic nature, this solution should not be disposed of down a drain, as it can eat away at plumbing. If you have a dedicated work space, place a lid over the solution and allow to sit for up to three days, until the solution is clear. you will notice a white film gather on the bottom of the bowl. Once the water is clear, it has neutralized naturally and is now safe to dispose down any drain with running water. If you do not have a dedicated work space and need to dispose of the solution quickly, add a large amount of baking soda directly to the solution. The baking soda will begin to fizz. Once the fizzing stops, the solution is then safe to dispose, though I still recommend waiting at least an hour before disposal. Though the solution can be reused (usually within a 24 hour period), I have had very limited success with it working quickly and oxidizing evenly beyond its initial use, so I suggest gathering jewelry or metal projects through the week, oxidizing at once, and then disposing the solution afterwards. Uh Oh! Now let’s say you just dipped your piece, scrubbed with the steel wool, and are horrified by the results! Never fear, the oxidization can be removed. That’s right. It doesn’t have to be permanent. Materials Needed
Next, line a glass or plastic bowl with tin foil (shiny side up). If using plastic, please be sure the container or bowl can accommodate boiling water. Lay your piece inside the bowl, pour boiling water on top (enough to cover) and sprinkle with baking soda. The baking soda should bubble and the tarnish should fall to the tinfoil. Remove the piece and allow it to cool natural, then rinse beneath lukewarm water. Pat dry and allow to air dry completely before storing. Pretty easy, right? Wondering what you were so worried about, right? Liver of Sulfur is a great way to add antique appeal to modern work. Have fun experimenting with various degrees of oxidization to see what best compliments your style. If you have any questions, please feel free to ask them below. If I don’t know the answer, I’ll do my best to find it for you. Happy weaving, everyone! Nicole On October 22, 2013
Copyright is an ever-evolving discussion on legal and moral rights and responsibilities, especially as regards creative work specifically, and is constantly misrepresented in areas of questionable morality. I will preface the following information and verbiage by stating I am in no way versed on copyright law and know only what I’ve read, at its face value. I have no experience with, or expertise of, court cases in which law has been expanded, overturned or created. This article is not intended to be all-inclusive nor to be a substitute for professional legal advice. These notes concern the copyright law as defined by the United States, and is non-transferable to any international legal system, and may not protect your rights across borders. To better represent the fickle beast that is copyright law, and to further this discussion, please feel free to share your opinions, experiences and sources in the comments. .First, lets define what is covered by copyright law. Chapter 1 of the law, titled “Subject Matter and Scope of Copyright”, states, in Section 102, that original works of authorship which are “fixed in any tangible medium of expression”, can include the following categories: literary, musical, dramatic, choreographic, pictorial, graphic, sculptural, motion picture, audiovisual, sound records and architectural, and are protected by the law as dictated by the United States legal system.Photographs, tutorials, books, paintings are all protected under copyright law. That means, when a photo is pulled from Google search, for instance, and altered with promotional slogans, poetic or inspirational quotes, or clip art, the user is (in essence) violating, unless where a release of rights has occurred, the copyright of the photographer. When a tutorial is purchased and re-sold by the purchaser, without the express written consent of its creator, the purchaser is in violation of the author’s copyright. When an ebook is purchased, then shared (in full) on a personal blog, the blogger is in violation of the author’s copyright. These are only a few examples, but hopefully sufficient in expressing the scope of the law. One argument, especially as concerns digital content in an electronic age, is that “Fair Use” protects the user from legal recourse. Here is what the law has to say about “Fair Use”. Chapter 1 (Section 107) “Limitations on exclusive rights: Fair Use”: “Notwithstanding the provisions of sections 106 and 106 A, the fair use of a copyrighted work, including such use by reproduction in copies or phonorecords or by any other means specified by that section, for purposes such as criticism, comment, news reporting, teaching (including multiple copies for classroom use), scholarship, or research, is not an infringement of copyright. In determining whether the use made of a work in any particular case is a fair use the factors to be considered shall include— (1) the purpose and character of the use, including whether such use is of a commercial nature or is for nonprofit educational purposes; (2) the nature of the copyrighted work; (3) the amount and substantiality of the portion used in relation to the copyrighted work as a whole; and (4) the effect of the use upon the potential market for or value of the copy righted work. The fact that a work is unpublished shall not itself bar a finding of fair use if such finding is made upon consideration of all the above factors.” Unfortunately, this means there is a very undefined distinction between what is fair use and what is infringement. No number of lines, words or amount of notes or general content are specified to be taken without permission and be free from legal repercussion. This, essentially, is a “proceed at your own risk” variable in the copyright law, and is determined per case. Ever heard the creative rule of derivatives, “alter 10% of a design”? Well, that’s, at best, a theory not supported by the law and, at worst, a gross and intentional misrepresentation of the law to excuse the theft of creative property. Are designs protected by copyright? According to Chapter 13 of the copyright law, “Protection of Original Designs”, the short answer is yes. Section 1301 notes protection is afforded “….an original design of a useful article which makes the article attractive or distinctive in appearance” with designs defined as “original” when “it is the result of the designer’s creative endeavor that provides a distinguishable variation over prior work pertaining to similar articles which is more than merely trivial and has not been copied from another source”. Recently I was shocked to read a statement declaring a piece of jewelry unoriginal because “the technique has been around forever”. However, according to Chapter 13, Section 1302, protection extends to original creative works except when: “(the design is) not original; staple or commonplace, such as a standard geometric figure, a familiar symbol, an emblem, or a motif, or another shape, pattern, or configuration which has become standard, common, prevalent, or ordinary; different from a design only in insignificant details or in elements which are variants commonly used in the relevant trades; dictated solely by a utilitarian function of the article that embodies it; or embodied in a useful article that was made public by the designer or owner in the United States or a foreign country more than 2 years before the date of the application for registration under this chapter.” This means it is not the technique that is protected, but the original combination of techniques. And, quite frankly, the required “difference in design” is often an undefined specification determined only by a court of law. Though you can, of course, feel free to execute a design using an unoriginal combination of techniques, this design may not be protected by copyright law if decided it is a standard example of the art form or form of expression. So, we know copyright covers the expression of an idea (Chapter 1) and covers an original design (Chapter 13), but does it cover the content of a tutorial? We know it covers the images and the verbiage, but Chapter 1, Section 102(b) states: “In no case does copyright protection for an original work of authorship extend to any idea, procedure, process, system, method of operation, concept, principle, or discovery, regardless of the form in which it is described, explained, illustrated, or embodied in such work”, therefore excluding the process of creation from protection. Here is an amazing and thorough article discussing why copyright is not extended to procedures and processes. What does this mean? This means the finished design in a tutorial is protected (possibly) by copyright, the images and written instruction are protected, but the steps used to achieve the design are not. You could, legally, share (best in carefully controlled quantities), the process of creating a piece of jewelry, as described in a tutorial (or book even). You cannot use the images, or the verbiage, as set forth by the author, but you can express the process in your own words with your own images, in whatever platform you prefer. However, because copyright is transferable to the finished piece, sharing the process can be a slippery legal slope. Also on the subject of tutorials, texts or books, can the author of a tutorial or set of instructions limit its use? In some cases, yes, and is best represented by the paragraphs on “Fair Use” already discussed. The reach of any legal action is determined per case and is based on the specifics of the use. In other words, why risk it? And really, that’s where the discussion of copyright brings us. Inevitably, it is always a discussion of ethics. Can you alter 10% of a design and fail to credit the originator? Can you purchase and teach the tutorials of others for profit? Can you copy because “there is nothing new under the sun” or “it’s all been done before?” Perhaps. But why would you? I refuse to believe, in a world as full as ours, in a society of unique individuals with budding creative spirits, that there are no new things. There is always another direction to take an existing idea which doesn’t infringe upon the rights of another. To say otherwise is to perpetuate a cloak of laziness which smothers the spirit of creativity. Though technique has been around, in many cases, for centuries, eons even, there is always an innovative combination of techniques waiting for discovery. Alternatively, don’t jump to conclusion that your rights have been maliciously violated. Take a deep breath. I know it’s a natural knee-jerk reaction to protect the creative project and the energy with which it was born, but not everyone is a greed goblin riding the coat tails of success. Don’t insist that because this one bead is placed in this one position, just like yours!, that you have been violated by the lawn gnomes of duplicity. Don’t insist everyone credit you with “inspired by” because their designs are swirly and your designs are swirly so they owe you a perpetual string of praise. Accolades are nice, and deeply appreciated by most everyone, but sometimes, voices are simply similarly expressive. Or, how about this? Just ask. Has your design been copied? Would you like to copy a design? Ask for clarity. Ask for permission. Ask for ideas and the right to utilize those ideas. Encourage a conversation with other creative minds, and don’t be afraid to just ask. Every artist or teacher supplies a Terms of Use and, whether legally binding or not, it is never beyond our capability to extend a little human courtesy and respect that someone else, quite frankly, did it first. There is a world of inspiration waiting for you to notice it, to give it form. Move on and embrace it. Or, simply put, just ask. On October 17, 2013
From newborn business owners, to seasoned sellers on platforms such as Etsy or Artfire, I hear it many times: “I don’t have the money to build a website.” But if you already pay for internet access, have a computer and product, then you have all you need to build a starter site for your business. Whether there is experience with web design or a complete unfamiliarity with HTML, if there is a thoughtful understanding of the customer, their needs and opinions, any website can be a success for you and your business. But building a business is about more than the website and here is what you need: Branding, platform and content. Branding Branding, to simplify, is a sort of all-inclusive, customer-oriented package of materials and promises which represent your business, your product and services. Though a recognizable name, logo and consistently-designed presence lays the groundwork for a successfully branded business, it is also important to define the mission statement of your business and understand the projected customer before branding can carry you further. The thing to remember is that you cannot be all things to all customers, so take time to discover and nurture your niche and market that skill or product to the right audience.
Once you’ve established your brand with a clear philosophy and identity, making yourself, skill or product available to the customer is absolutely necessary for furthering a successful business. Though choosing a platform is part of the all-inclusive branding model, I felt it was important to discuss on its own, since this seems to be the point at which many small business owners (or hopeful business owners) stop and say “Woah, now. I just invested a lot of money in my product and packaging. I have nothing else to give”. But choosing a platform doesn’t have to cost a dime… or many dimes, at least.
Content Content is probably the most straight-forward of all the business-building elements, requires the most time, dedication and thought, but is often the most over-looked. Though directly related to branding and platforms, content is the one element which supercede them all. Without good content, your business will fail to produce the results you need for continued growth and success. Your product, interaction with customers, and the information your business, website or brand provides to the general public is what defines your business model. So focus on content first and numbers last.
|
Enjoy my content?
Categories
All
Archives
February 2023
Follow Me!Search My Site!
Feed your creative spirit! Shop now!
|