|
On August 11, 2012
Silver-filled wire is marketed as a precious metal alternative, providing the results of sterling silver at a reduced cost, and has moved through the artisan community with a quiet speed, gaining popularity every day, while the price of sterling silver fluctuates at an unpredictable pace. Silver-filled wire is 10% sterling plate mechanically heat bonded to a brass or copper-alloy core, with a layer of silver a hundred times thicker than most commercial silver plated metals, allowing the artist more workability as a sterling product with greater design options. I’ve had the opportunity to use this wire for a while now, and though I find it a suitable, even preferable, alternative to an enameled copper wire, craft wire or sterling plated copper, I think it falls short of a sterling or fine silver replacement. This is not to say I’m not happy to share this product with customers. Silver-filled wire oxidizes well with Liver of Sulfur Extended Life Gel (review soon), buffs to a nice shine and wears very well. Information about this product states it can be soldered, though I’ve not had the opportunity to test this claim. It does not ball well when torch-heated, and carries thick fire scale when attempted, due to it’s copper alloy base, so this is a design element I’ve yet to enjoy with this wire. The half-hard holds it’s shape well, provides sufficient “spring” for ear wires, and doesn’t seem to effect sensitive skin in a negative manner. I do recommend, however, special care be taken with oxidization and subsequent buffing. If you choose to oxidize, use a low temperature heated water and Liver of Sulfur solution. Better to dip multiple times than strip your piece of its plating. A gentle hand is required when buffing. A heavy handed steel wool buffing can quickly remove plating, reveal the brass beneath and result in a brown soiled or smudged finish. Though manufacturers try to market this as a bi-metal effect great for engraving, I find it unattractive. Overall, this wire is best suited for those who appreciate an oxidized silver look without the cost of sterling, especially when buying in bulk, or for hobbyists. But for those with dollars to spare, I recommend (and prefer) sterling or fine silver. When considering the little savings, 1/10th the silver, and given it’s inherent shortcomings, seems hardly sufficient.
0 Comments
On August 19, 2014
Creating, sharing a hobby or running a business in the age of electronic media is a delicate matter, both for the artist and for those viewing or sharing his or her work. It’s important to credit designers and artists for their hard work and talents, while also expressing a love for art and creativity, in general, and promoting an atmosphere of sharing, in which creativity is fostered in others. Social media is an excellent means by which to spread inspiration, with a far-reaching audience, including an endless array of interests and talents. This massive collection of creative individuals, however, also results in its own set of complications, so I’ve compiled a list of what has been, in my experience, the do’s and don’ts of social sharing. Please feel free to discuss these points or add your own in the comments below. In general: DO always credit your source. If you find an image online and would like to share it, do so from the source, by linking. Links to an artists website or store front help the artist improve Google search ranking. Always make an effort to name designers or stores or brands, when sharing their products. DO always credit the design to its designer. If you’ve purchased a tutorial, and made a product or piece from those instructions, even if deviating from the design, it’s polite (important even) to always credit the designer wherever and whenever your item is posted online. The same piece can be posted on five social networking sites, and the design should be credited in each instance. This helps spread awareness of the designer, which allows him or her to continue to provide quality lessons. When design credit is not listed, the cycle of sharing is broken. DO NOT download the images or artwork of others to your own hard drive, mobile or electronic device. Often, when this habit is perpetuated, design credit is lost, and the image is re-circulated online without a proper source. This cheats the designer and the customer, who might wish to search for other work. Link, link, link, and share from the source. Bookmark the page or image and save a file of those bookmarks for future reference. DO NOT edit the images or artwork of others, without permission from the artist or owner (unless when using free-use images). Memes… I’m looking at you! You know that beautiful photo of a tiny puppy in a tea cup? You know how that might make you want to edit the phrase “If I fits, I sits” all over that image? Please don’t, and I’ll tell you why. Photographers can spend hours finding the perfect location, scouting the perfect models, editing the 129 images of the same scene to find the perfect, holy grail of shots. Painters spend days building a scene on their canvas, and an equally labor-intensive time photographing and editing images of their work. Essentially, by editing phrases or poetry over the images of others, regardless of intent or charm or sentimental value, you are defacing their work. Please respect the time and talents of artists and photographers and request permission to alter the image. DO NOT get upset when conversation is not reciprocated. At a cocktail party, it’s generally considered rude to walk away from a person who began a conversation with you, but when 97 people also began a conversation with you, I think it’s safe to assume it’s an oversight. Pinterest DO NOT pin a product to your Do It Yourself or DIY board, unless the product or design is clearly intended for use by others. Posting a product or image online is not equivalent to “fair use”. and most products are intended to be purchased ready-to-use, not pinned as ready-to-make. For the sake of etiquette, rename your DIY boards as “Inspiration Boards”, instead, and draw creativity from the source, but do not mimic the source, unless so intended by the creator. DO personalize the description on all pins. You can do this from laptops, desktops and mobile device apps. When an item is re-pinned, the description with it (from the previous or original pinner) carries over to the current pin. For instance, I pinned an image of a beautiful photograph without having realized the description read “I’m totally going to remove the watermark, print it myself and hang this in my room!” So… theft, essentially. And there was no indication the description wasn’t my own! So read pin descriptions carefully and edit accordingly. More importantly, research the source, and edit to reference it. Facebook DO NOT tag indiscriminately. Make sure the tag is relevant to the person being tagged. Sarah may love wire wrap jewelry, but that doesn’t necessarily mean she wants to be tagged in every photo of jewelry I post, despite my (ahem….often self-congratulatory) pride. Even in the ether of the internet, personal space is still a commodity closely held by many, and it’s important to respect the idea of space and, just as important, time. Often, with hundreds of likes per user, news feeds and the notification tabs are busy enough with posts and pages the user chose to see (and some Facebook chooses the user to see!), so an additional influx of tagged notifications can be frustrating. DO NOT request “likes for likes”, unless where there is a thread or forum specifically for this purpose. I know, it seems like sometimes it’s easy to get lost in the crowd, and the best way to build an audience is to farm for likes. But likes given only under the prerequisite of reciprocation do neither the giver nor the receiver any good. And here’s why…. traffic to and from Facebook business pages is decided on two main factors: the content of a page, and the genuine interaction it receives. Though a “like for likes” campaign may generate followers, it does not generate fans or traffic. It’s important to build these relationships naturally and genuinely and to like pages and products, in your opinion, deserving of it. DO NOT spam the business pages of others. I promise there are a whole collective of page owners who have done it, and most without a nefarious bone in their body. Somewhere along the line, just past the building-a-business starting gate, we’ve trolled the active business pages of others, dropping a link to our website or Facebook page, hoping for a boost to our numbers. It happens. But, like the previous suggestion, this doesn’t generate genuine interaction and, in some cases, can even get you banned by users, which is a sad happenstance that benefits no one. DO engage with pages, artists and businesses you’ve liked. The more you engage, the more informed you’ll be on new updates. Though clicking that “like” button is a fabulous way to express support for an idea, sentiment or project, conversing about it is even better, and will guarantee posts from the page continue to appear in your feed. DO (as previously mentioned) always credit designers, in every instance when applicable, even in cases of derivative or “inspired by” looks. Twitter Quite frankly, Twitter and Tumbler confound me. Just… um… don’t get upset when I fail to reply to your tweet. Because I don’t know how. It’s shameful, I know. I should really learn to Twitter better. But if you have Twitter etiquette, please share it below! Now, I know social media can be overwhelming. Many juggle a dozen social platforms a day, and do so swimmingly. Some, however (myself included), sometimes feel as though they’ve been dropped in a foreign country with a translate app that’s failed to work. Eeep! But despite the confusion, social media and social sharing can be a fun and beneficial experience. Excuse yourself the mistakes, and aim to fix them. It’s the best any of us can do! Happy weaving! Nicole On January 17, 2014
Do not fear the Liver of Sulfur. I repeat: do not fear the Liver of Sulfur! Oxidization is a science experiment for metal addicts and can prove entertaining, challenging and inspiring all wrapped up in the guise of jewelry fun, creating an antique look to modern art jewelry. And you know what? It’s easy to fix if you don’t like it, so the only thing left to do is enjoy yourself and prepare to take your jewelry or metal work to a defining new level with a product both easy to master and essential for the antique look popular in the metal work and jewelry worlds. Settle in and enjoy! Materials Needed
Let’s Get Started First begin by preparing a neutralizing bath for pieces dipped in the Liver of Sulfur solution. This will prevent the oxidizing process from continuing once the piece has reached the desired color. In the second bowl, pour a cup of lukewarm water. Into the water, stir two tablespoons of baking soda, until dissolved, and set aside. Next, it is important to clean your jewelry items before oxidizing. Oils from the skin can lay a film over metal to which the Liver of Sulfur solution cannot adhere, causing uneven discoloration. To prevent this, add a few drops of dish-washing liquid to a third bowl, fill with hot water and swish the jewelry many times. Rinse beneath a tap as the water turns from lukewarm to hot. Wearing gloves during this process will help prevent new prints from marking the jewelry once clean. Note: Using hot tap water during this process helps warm delicate stones gradually, which are otherwise susceptible to sudden temperature changes. However, with that said, I caution against using hot water on very delicate stones such as opals. Now it’s time to oxidize! In the primary glass bowl, pour one cup of hot water. This water should be steaming, but pre-boil. I find water through a clean coffee pot is the perfect temperature for oxidizing. In lieu of a coffee pot, microwave the water for one minute. Dip the tip of a disposable plastic spoon into your Liver of Sulfur gel to collect a few drops. It has a thick consistency and a sufficient amount of gel will stick to the spoon tip without the need to scoop. If your gel comes in a container that administers the product in drops, use two or three drops to start. This may be added to as necessary. Stir the gel into the water until it turns a vibrant yellow, but still transparent. If the water is pale, add another drop. Since the Liver of Sulfur solution works best in hot water, do not wait once the solution is prepared. Using the spoon with which the solution was stirred, add the jewelry items. If the water is hot enough, the metal should immediately begin to turn dark. The metal will oxidize in stages, often presenting themselves in colors: usually green, brown, blue then black. The metals may be removed at any time during this process if it has reached the desired color, though I recommend black for optimal results. Once your jewelry or metal items have reached the desired color, use the previously mentioned spoon to remove the item from the solution. Drop the jewelry or metal items gently into the neutralizing bath, and let sit for a few minutes. Remove your jewelry or metal items from the neutralizing bath. At this point, they are safe to handle without gloves or spoon. Turn the tap on lukewarm and rinse your jewelry or metal items. While the water runs, begin to scrub the metal with a fine steel wool pad (readily available at hardware stores), careful of any delicate stones. By scrubbing with a steel wool pad, the oxidization is removed from raised surfaces, which are then emphasized by the oxidization left in the crevices. This is a time-consuming process, due to the special attention needed on cracks, crevices or folds of heavily woven or worked metal jewelry. Fine steel wool will often leave fibers imbedded in these crevices, which can easily be removed by gently brushing the piece with a soft-bristle toothbrush dedicated for jewelry or metal work. Pat the piece dry as thoroughly possible, and allow to air dry completely before storing. And that’s it. The steps seem plentiful and sometimes complicated, but once you organize your own system, the entire process can move along in a handful of minutes. You can dispose of the neutralizing bath and soapy wash water down a sink drain, but the Liver of Sulfur solution needs more care in its disposal. Because of its toxic nature, this solution should not be disposed of down a drain, as it can eat away at plumbing. If you have a dedicated work space, place a lid over the solution and allow to sit for up to three days, until the solution is clear. you will notice a white film gather on the bottom of the bowl. Once the water is clear, it has neutralized naturally and is now safe to dispose down any drain with running water. If you do not have a dedicated work space and need to dispose of the solution quickly, add a large amount of baking soda directly to the solution. The baking soda will begin to fizz. Once the fizzing stops, the solution is then safe to dispose, though I still recommend waiting at least an hour before disposal. Though the solution can be reused (usually within a 24 hour period), I have had very limited success with it working quickly and oxidizing evenly beyond its initial use, so I suggest gathering jewelry or metal projects through the week, oxidizing at once, and then disposing the solution afterwards. Uh Oh! Now let’s say you just dipped your piece, scrubbed with the steel wool, and are horrified by the results! Never fear, the oxidization can be removed. That’s right. It doesn’t have to be permanent. Materials Needed
Next, line a glass or plastic bowl with tin foil (shiny side up). If using plastic, please be sure the container or bowl can accommodate boiling water. Lay your piece inside the bowl, pour boiling water on top (enough to cover) and sprinkle with baking soda. The baking soda should bubble and the tarnish should fall to the tinfoil. Remove the piece and allow it to cool natural, then rinse beneath lukewarm water. Pat dry and allow to air dry completely before storing. Pretty easy, right? Wondering what you were so worried about, right? Liver of Sulfur is a great way to add antique appeal to modern work. Have fun experimenting with various degrees of oxidization to see what best compliments your style. If you have any questions, please feel free to ask them below. If I don’t know the answer, I’ll do my best to find it for you. Happy weaving, everyone! Nicole On October 22, 2013
Copyright is an ever-evolving discussion on legal and moral rights and responsibilities, especially as regards creative work specifically, and is constantly misrepresented in areas of questionable morality. I will preface the following information and verbiage by stating I am in no way versed on copyright law and know only what I’ve read, at its face value. I have no experience with, or expertise of, court cases in which law has been expanded, overturned or created. This article is not intended to be all-inclusive nor to be a substitute for professional legal advice. These notes concern the copyright law as defined by the United States, and is non-transferable to any international legal system, and may not protect your rights across borders. To better represent the fickle beast that is copyright law, and to further this discussion, please feel free to share your opinions, experiences and sources in the comments. .First, lets define what is covered by copyright law. Chapter 1 of the law, titled “Subject Matter and Scope of Copyright”, states, in Section 102, that original works of authorship which are “fixed in any tangible medium of expression”, can include the following categories: literary, musical, dramatic, choreographic, pictorial, graphic, sculptural, motion picture, audiovisual, sound records and architectural, and are protected by the law as dictated by the United States legal system.Photographs, tutorials, books, paintings are all protected under copyright law. That means, when a photo is pulled from Google search, for instance, and altered with promotional slogans, poetic or inspirational quotes, or clip art, the user is (in essence) violating, unless where a release of rights has occurred, the copyright of the photographer. When a tutorial is purchased and re-sold by the purchaser, without the express written consent of its creator, the purchaser is in violation of the author’s copyright. When an ebook is purchased, then shared (in full) on a personal blog, the blogger is in violation of the author’s copyright. These are only a few examples, but hopefully sufficient in expressing the scope of the law. One argument, especially as concerns digital content in an electronic age, is that “Fair Use” protects the user from legal recourse. Here is what the law has to say about “Fair Use”. Chapter 1 (Section 107) “Limitations on exclusive rights: Fair Use”: “Notwithstanding the provisions of sections 106 and 106 A, the fair use of a copyrighted work, including such use by reproduction in copies or phonorecords or by any other means specified by that section, for purposes such as criticism, comment, news reporting, teaching (including multiple copies for classroom use), scholarship, or research, is not an infringement of copyright. In determining whether the use made of a work in any particular case is a fair use the factors to be considered shall include— (1) the purpose and character of the use, including whether such use is of a commercial nature or is for nonprofit educational purposes; (2) the nature of the copyrighted work; (3) the amount and substantiality of the portion used in relation to the copyrighted work as a whole; and (4) the effect of the use upon the potential market for or value of the copy righted work. The fact that a work is unpublished shall not itself bar a finding of fair use if such finding is made upon consideration of all the above factors.” Unfortunately, this means there is a very undefined distinction between what is fair use and what is infringement. No number of lines, words or amount of notes or general content are specified to be taken without permission and be free from legal repercussion. This, essentially, is a “proceed at your own risk” variable in the copyright law, and is determined per case. Ever heard the creative rule of derivatives, “alter 10% of a design”? Well, that’s, at best, a theory not supported by the law and, at worst, a gross and intentional misrepresentation of the law to excuse the theft of creative property. Are designs protected by copyright? According to Chapter 13 of the copyright law, “Protection of Original Designs”, the short answer is yes. Section 1301 notes protection is afforded “….an original design of a useful article which makes the article attractive or distinctive in appearance” with designs defined as “original” when “it is the result of the designer’s creative endeavor that provides a distinguishable variation over prior work pertaining to similar articles which is more than merely trivial and has not been copied from another source”. Recently I was shocked to read a statement declaring a piece of jewelry unoriginal because “the technique has been around forever”. However, according to Chapter 13, Section 1302, protection extends to original creative works except when: “(the design is) not original; staple or commonplace, such as a standard geometric figure, a familiar symbol, an emblem, or a motif, or another shape, pattern, or configuration which has become standard, common, prevalent, or ordinary; different from a design only in insignificant details or in elements which are variants commonly used in the relevant trades; dictated solely by a utilitarian function of the article that embodies it; or embodied in a useful article that was made public by the designer or owner in the United States or a foreign country more than 2 years before the date of the application for registration under this chapter.” This means it is not the technique that is protected, but the original combination of techniques. And, quite frankly, the required “difference in design” is often an undefined specification determined only by a court of law. Though you can, of course, feel free to execute a design using an unoriginal combination of techniques, this design may not be protected by copyright law if decided it is a standard example of the art form or form of expression. So, we know copyright covers the expression of an idea (Chapter 1) and covers an original design (Chapter 13), but does it cover the content of a tutorial? We know it covers the images and the verbiage, but Chapter 1, Section 102(b) states: “In no case does copyright protection for an original work of authorship extend to any idea, procedure, process, system, method of operation, concept, principle, or discovery, regardless of the form in which it is described, explained, illustrated, or embodied in such work”, therefore excluding the process of creation from protection. Here is an amazing and thorough article discussing why copyright is not extended to procedures and processes. What does this mean? This means the finished design in a tutorial is protected (possibly) by copyright, the images and written instruction are protected, but the steps used to achieve the design are not. You could, legally, share (best in carefully controlled quantities), the process of creating a piece of jewelry, as described in a tutorial (or book even). You cannot use the images, or the verbiage, as set forth by the author, but you can express the process in your own words with your own images, in whatever platform you prefer. However, because copyright is transferable to the finished piece, sharing the process can be a slippery legal slope. Also on the subject of tutorials, texts or books, can the author of a tutorial or set of instructions limit its use? In some cases, yes, and is best represented by the paragraphs on “Fair Use” already discussed. The reach of any legal action is determined per case and is based on the specifics of the use. In other words, why risk it? And really, that’s where the discussion of copyright brings us. Inevitably, it is always a discussion of ethics. Can you alter 10% of a design and fail to credit the originator? Can you purchase and teach the tutorials of others for profit? Can you copy because “there is nothing new under the sun” or “it’s all been done before?” Perhaps. But why would you? I refuse to believe, in a world as full as ours, in a society of unique individuals with budding creative spirits, that there are no new things. There is always another direction to take an existing idea which doesn’t infringe upon the rights of another. To say otherwise is to perpetuate a cloak of laziness which smothers the spirit of creativity. Though technique has been around, in many cases, for centuries, eons even, there is always an innovative combination of techniques waiting for discovery. Alternatively, don’t jump to conclusion that your rights have been maliciously violated. Take a deep breath. I know it’s a natural knee-jerk reaction to protect the creative project and the energy with which it was born, but not everyone is a greed goblin riding the coat tails of success. Don’t insist that because this one bead is placed in this one position, just like yours!, that you have been violated by the lawn gnomes of duplicity. Don’t insist everyone credit you with “inspired by” because their designs are swirly and your designs are swirly so they owe you a perpetual string of praise. Accolades are nice, and deeply appreciated by most everyone, but sometimes, voices are simply similarly expressive. Or, how about this? Just ask. Has your design been copied? Would you like to copy a design? Ask for clarity. Ask for permission. Ask for ideas and the right to utilize those ideas. Encourage a conversation with other creative minds, and don’t be afraid to just ask. Every artist or teacher supplies a Terms of Use and, whether legally binding or not, it is never beyond our capability to extend a little human courtesy and respect that someone else, quite frankly, did it first. There is a world of inspiration waiting for you to notice it, to give it form. Move on and embrace it. Or, simply put, just ask. On October 17, 2013
From newborn business owners, to seasoned sellers on platforms such as Etsy or Artfire, I hear it many times: “I don’t have the money to build a website.” But if you already pay for internet access, have a computer and product, then you have all you need to build a starter site for your business. Whether there is experience with web design or a complete unfamiliarity with HTML, if there is a thoughtful understanding of the customer, their needs and opinions, any website can be a success for you and your business. But building a business is about more than the website and here is what you need: Branding, platform and content. Branding Branding, to simplify, is a sort of all-inclusive, customer-oriented package of materials and promises which represent your business, your product and services. Though a recognizable name, logo and consistently-designed presence lays the groundwork for a successfully branded business, it is also important to define the mission statement of your business and understand the projected customer before branding can carry you further. The thing to remember is that you cannot be all things to all customers, so take time to discover and nurture your niche and market that skill or product to the right audience.
Once you’ve established your brand with a clear philosophy and identity, making yourself, skill or product available to the customer is absolutely necessary for furthering a successful business. Though choosing a platform is part of the all-inclusive branding model, I felt it was important to discuss on its own, since this seems to be the point at which many small business owners (or hopeful business owners) stop and say “Woah, now. I just invested a lot of money in my product and packaging. I have nothing else to give”. But choosing a platform doesn’t have to cost a dime… or many dimes, at least.
Content Content is probably the most straight-forward of all the business-building elements, requires the most time, dedication and thought, but is often the most over-looked. Though directly related to branding and platforms, content is the one element which supercede them all. Without good content, your business will fail to produce the results you need for continued growth and success. Your product, interaction with customers, and the information your business, website or brand provides to the general public is what defines your business model. So focus on content first and numbers last.
Equipment Camera. While it is true you don’t need professional tools, lenses or accessories to create a clean image or atmospheric setting, I will not lie…. it helps. I use a Nikon D90 camera with a 90mm Tamron macro lens, which takes me straight from pet portraiture to product photography in less time than it takes to auto focus. This might seem an excessive camera for most whose needs do not extend as far into professional photography as mine, but macro settings, even on professional cameras, are sometimes insufficient if appropriate accessories are not available (tripods or lights), so I highly recommend a pro-sumer camera and macro lens if funds allow. That is not to say point and shoot cameras are incapable of outrageously sharp images. The Canon G12 ($300) is highly rated for its macro capabilities and is sometimes used as second shooting equipment for professional photographers. If you’re ready to upgrade to a fully manual DSLR, a good beginner camera is the Nikon D3200 or the Canon Rebel. Both of these are of a comparable price ($500), and provide you the opportunity to experiment more heavily with professional product photography, without an outrageous financial burden. A nice mid-range camera is the Nikon D5000, which has unbelievable low-light shooting capabilities, perfect for studio work. Determine which best fits your needs, and ask yourself in what ways you’d like your camera to function, what your budget allows, and how far you’re willing and able to go.
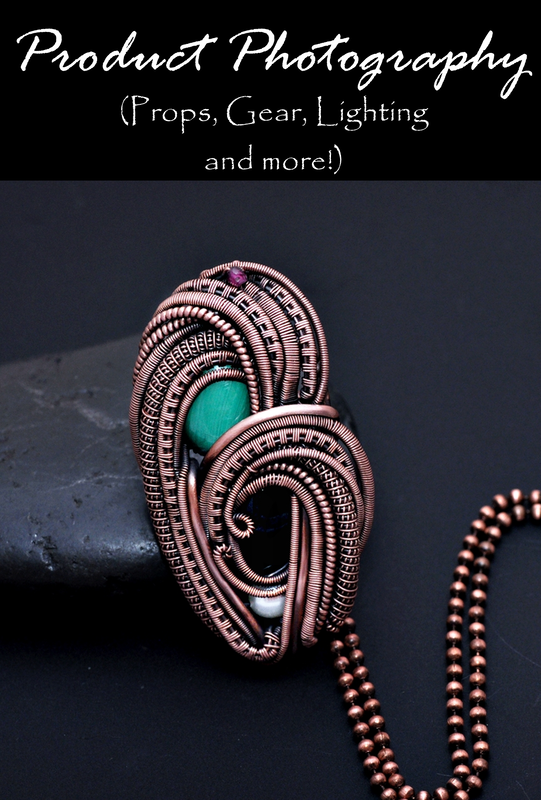
Lens. Though I recommend the purchase of a reliable camera with excellent macro capabilities, typically $300-$500, that does not mean the Kodak EasyShare you got for Christmas wont work. It’s not ideal equipment for product photography, but there are fabulous tools at your disposal to make even the most inexpensive camera take sharp images. The Little BigShot is an image amplifying lens attachment used for most models of point and shoot cameras, at an unbelievably reasonable price. This attachment will transform a $100 camera into a $400 camera with a removable lens and some velcro… because let’s face it…. when is velcro ever bad? Google it, visit the blog, watch the videos, peruse the photos and be amazed. With that said, I stick by my philosophy that a great camera is tantamount to great product photography, and this lens is a wonderful, albeit temporary, solution for artists on a budget. On-Camera Flash. Don’t use it. On-camera flash is, to professional photography, what a child’s wiffle ball is to the NBL. It causes glare, especially on metal or reflective surfaces, which post-processing cannot rectify and which detract from the product or photo focal. Jewelry artists can’t afford to misrepresent their work in an online environment, where the photograph is your only impression. A client can’t appreciate the value of a beautiful piece of labradorite, for instance, if the flash obstructs the “fire” of the stone. If you feel you have absolutely no choice but to use a flash (it's perpetual night) then create a small bubble of wax paper, folded in quarters and tapeed over your flash, and this will help diffuse the intensity of the light. It is not ideal, but it will help reduce the possibility of glare while still providing ample (and usually excessive) light. Though difficult to juggle, especially if your camera is heavy, you can also hold a small white envelope or piece of cardboard between your on-camera flash and the top of the lens, in front of the camera, and angle the envelope or board upwards. This will bounce the light away from the subject, while still filling the room, allowing for an indirect fill light. If you can afford to invest in equipment, purchase an off-camera flash, such as the SB-600 ($250 or less) for Nikon or the Speedlight 320EX for Canon cameras, or ask a sales associate to show you off-camera flash for point and shoot cameras, because they do exist. An off-camera flash is an excellent substitution for full studio lights, with practice, and a phenomenal alternative for the jeweler without the work room or space for a permanent studio. Studio My studio consists of a light tent on a chair and a shop light on either side. Assuming you all have chairs as equally functional, this entire set-up cost $75, including all of my props and bulbs. Amazon has fantastic opportunities for product photographers, including the $10 light tent by Photo Tents (Model PT40), and shop lights, courtesy of Lowe’s at $7 a piece. I own four lights (both sides, back and top), but mostly use only two, depending on the time of day and other available ambient light. Though natural light is the most inexpensive “studio” available, it is, at best, inconsistent. You must avoid direct sunlight (which creates shadow and glare), and the time of day will alter the temperature, white balance and over-all “mood” of your final image. An extra layer of clouds across the sun between shots will create a vast difference between two images and require a great deal more time in post-processing if you aim to provide a cohesive look. Not to mention I’m simply not so dedicated to my craft I will photograph outdoors in a Michigan winter, for the benefit of natural light. Me likey toes. Me no likey frostbite. But do you have to order equipment, you ask. Absolutely not. Is ordering an inexpensive light tent easier than mapping Mother Nature. Yes. Easier than making one and just as cost-effective? You betcha, in my best Sarah Palin voice (which is to say… not her voice at all). And, in my opinion, a far preferable solution. This tent comes with four colored backdrops and folds into a convenient carrying pouch which tucks neatly in my camera backpack. You will NOT find a studio that takes up less room than this, I guarantee, and in my 1000 square foot home, a space saver is a life saver. Pull it out of its case, set it on a chair or dining room table, use an off-camera flash, and I have a portable studio. However, if you are dead set on creating your own light tent, here are a few options for your creative entertainment. Milk Carton. Wash and dry an empty opaque white milk carton. Cut off the top 1/4 in a reasonably straight manner. Place daylight bulbs on either side. Use a cloth, tile or other backdrop and get to shooting. For “floating” images, poke a small hole on either side and run fishing line through the inside of the milk carton. Hang your pendant or product from the fishing line (which wont be seen in the final image), and voila… you have a “floating” pendant. Why is this listed first? Because it’s the cheapest alternative. Not pretty, but functional enough. Tupperware. Oh Tupperware, how my obsessive compulsive disorder loves thee. Tupperware is a great studio alternative and, best yet… you can store your lights, jewelry and tools inside and pack it away when you’re done. Lay your opaque or clear container on its side, line the walls with wax paper to diffuse (or soften) incoming light, place your lights on either side, and you have an insta-tent. I recommend a size no larger than 14″ square for jewelry photography, or your product will get lost in insufficient lighting. The smaller the container, the less room in which the light must reflect… meaning a brighter studio, less work for your camera and a sharper image overall. PVC Pipe. This is my last suggestion because, quite frankly, it’s just too much work in my book. Get yourself enough pipe and connecting elbows to create a box shape, drape an opaque fabric (or wax paper) so all but one side is covered, place lights on the outside and you’re good to go. There are diagrams aplenty available in a generic Google search for PVC Pipe Light Tent. Yes, you can attach clip-on lamps to the pipe, which is convenient, and the pipes can be dismantled for storage, but it’s not as time-friendly a process as the other options mentioned. Creating Atmosphere The inside of my light tent consists of a handful of things: several pieces of 10 x 10″ card stock in different neutral colors, a black river rock, a slate tile, and, if I’m feeling particularly adventurous, a prop head or hand. Keeping these things inside the tent while shooting (with the exception of the prop head or hand) allows for easy transfer of product to achieve multiple photographic looks. I also own a piece of black and white acrylic. Acrylic, as featured in the photograph at the beginning of this post, has a rich professional appeal, with a nice reflection to compliment the piece and a smooth flow of light. I also use small props like the single river rock featured with the stud earrings, however, a porous log, piece of driftwood, bright red or green leaves and pine cones also make excellent props. But the use of backdrop and prop is completely dependent upon the desired mood. Without mood, you have an uninspiring final image. Who wants to buy an uninspiring product? My mood changes frequently and, as such, my photographs do as well. Acrylic for a stylized professional approach. Stone or slate tile for an earthly ambiance, cardstock for an appealing middle ground. Here are a few tips to keep in mind when creating atmosphere in your product photography. Your props should compliment the background and create a subtle contrast. A white rock on a black piece of acrylic, a multicolor leaf, or beans and multiple small accessories all detract from the overall enjoyment of the artistry, and creates a sense of visionary confusion. Your props should not compete for attention, but compliment the focus of attention. A black stone on a piece of gray slate, however, is much more complimentary to one another, and therefore creates no unnecessary contrast to detract from the product. Black props with black backgrounds. White or beige props with white backgrounds. Avoid beans, rice or pebbles, which could detract from detail, especially in wire wrapping or chain mail. These are trusted guidelines for creating solid images. Also, when you change photographic styles, I recommend changing ALL the images in your shop, which should reflect your vision as a unit. Two photographs with a bean background, one photograph with black acrylic, one photograph with doilies and newsprint and scrapbooking paper create an uneasy sense of confusion. This doesn’t mean 128 pieces should be re-photographed immediately, but you should aim to replace several a day in your effort to achieve a cohesive look. Technique Techniques will always vary dependent upon the camera, lenses or other equipment at your disposal, but those offered here will be generically applied to all. First. I recommend a photo-editing software that extends beyond that which comes with your camera or installed on your computer. They are, and always will be, woefully insufficient for the processing of professional images. Photoscape is an excellent program, free, easy to use, and works well on laptops, netbooks or hardware that has little available space. Gimp is free, but hardly user-friendly unless you are familiar with extensive programs like Photoshop, and it can monopolize a lot of space on a netbook, and slow your computer to a crawl. If you have the computer capacity and the funds, I highly recommend Lightroom 3 (Lightroom 4 is now available, but not as appropriate for beginners) for photographic editing, which is easier to use than Photoscape, providing extensive user control, and is wildly more affordable than other Adobe post-processing or image manipulation programs at just $75. Second. Learn. Your. Camera. Read your manual…. and then read it again. Take shots in every mode allowable by your camera, in every possible lighting scenario. And keep in mind these terms: ISO – determines how sensitive your camera is to available or ambient light, Aperture – the size of the opening of the lens through which light enters, and Shutter Speed – the speed at which the shutter of your lens opens and closes and the amount of time during which light is available to the sensors of your camera. Too much light (slow shutter speed) will wash out a photograph and create motion blur. Too little light (fast shutter speed or small aperture) and your product will be underexposed. And though excellent photo editing programs can recover some poorly shot images, getting it right in camera will save you time you never knew you were wasting. Depending on your camera, keep your ISO at 400 or less (point and shoot) or 1000 or less (most DSLRs). Higher ISO and your pictures will contain noise or grain which cannot be removed post-process without sacrificing the integrity of the final image. To keep your ISO at one of these manageable levels, you may need to adjust your settings manually and take your camera off Auto Mode for full control. Aperture Priority (usually indicated by an A on your camera mode dial) is sometimes preferable as it creates a sense of depth with appropriately placed background blur, as seen in the image of the stud earrings above. Note how the stone and earrings are in focus, but the background (which is a ridged piece of gray card stock) appears to be a nice smooth surface with consistent color? That is all thanks to an appropriate aperture setting of about f/8, though exact settings will depend on how close to the subject you intend to get. The further from your subject you get, the more your camera will see your background and subject as existing on a similar “plane”, reducing background blur and creating more focus. You can also use Aperture or Shutter Priority modes, which allows the operator to set only the Aperture or Shutter Speed to a desired level, and adjusts all other elements automatically. It’s a step up from Auto, while still allowing for a high degree of ease. Just remember the following: a larger aperture allows for more light and creates more depth-by-blur, represented by a small F-Number (f/4), and a smaller aperture allows less light and creates more focus, represented by a large F-Number or F-Stop (f/18). In the photo of the stud earrings, I felt the ridged backing board would detract from the jewelry if it were in focus, so I chose to use a larger F-Stop. In the photo at the beginning of this post, background blur wasn’t the desired effect, and full focus was preferred, so I used a smaller F-Stop of f/16. Third. Tripods. When using a point and shoot camera, especially, (though this holds true for mid-range and professional DSLR’s as well) which doesn’t allow for low-light or studio work, you may find your camera automatically compensates for low light conditions by adjusting its shutter speed to less than 1/60 of a second, in most cases. Sometimes adjusting to as slow as 1/3 of a second! Any shutter speed less than the length of your lens is unacceptable for quality images. A 90mm lens, for instance, requires at least 1/90 of a second shutter speed, assuming you are holding your camera in hand. At 1/60 of a second, with camera in hand, you begin to fall victim to camera shake. What’s camera shake, you ask? It’s when, during that 1/60 of a second, your camera records all the movements you make while holding it. This presents itself as unintentional blur in your shots, resulting in soft edges and a loss of detail. A tripod allows you to stabilize your camera and prevent operator movement (and its resulting blur), and for point and shoot cameras is remarkably affordable ($30 or less) and, in my opinion, absolutely necessary. With a tripod, you can use a slower shutter speed in less light, without capturing unintentional movement. This will provide cleaner and sharper images overall. Fourth. Use sufficient lighting. The more lighting you have the less work your camera has to do to capture a clear image. If an off-camera flash is out of your budget, daylight bulbs and shop lamps are a wonderful addition to any studio. They allow you to shoot any time of day or year, regardless of the elements, and gives a consistent stream of light every time, assuming your set-up remains the same. An important thing to remember in regards to lighting is that your lights or flash should never point directly at your subject. Your camera will read this as “Woah! Too much light!” and will likely over or under expose the shot. If using shop lights, place them directly to the sides and above your product. Rely on your light tent to bounce the light an appropriate amount. If using an off-camera flash, adjust so the flash bounces off the inside top or side of your light tent. The white walls will do their magic and move that light around in the 1/100 of a second it takes to finalize your shot in-camera. Fifth. Post process. You may think your image is fine in camera, but in almost every conceivable scenario, (save a professional photography studio) it needs to be post processed in an editing program to achieve a professional look. If you aren’t using gray cards in your shots (you can find YouTube videos to explain the use of these) the temperature or warmth, white balance or tone, clarity or contrast enhancement, brightness and depth are all things to adjust manually per the allowable limits of your software. Adjusting these allow you to maintain true color and richness that amateur photographic equipment simply cannot process, and sufficient lighting cannot always provide. Play with your software, learn every available function and, most importantly, have fun! Keep in mind, however, over-processing an image, especially an image from a point and shoot camera, which, by its nature, has less pixels and less “information” with which to work, may damage the integrity of the shot. If your camera allows, shoot in RAW (read your camera manual for further information), and over-processing becomes less likely. And please, try not to crop a full res image down to a tiny square in the center of the shot where your subject rests. Get CLOSE to your subject and shoot. Don't shoot far and crop close, which will degrade the image and, depending upon the severity of the crop, cause horrible pixelization and photo "fuzz". Sixth. Sharpness. Do not have fun at the expensive of abusing the “sharpness” function on your editing software. If you have sufficient lighting, a dependable camera and whatever accessories necessary, dependent upon your other gear, you should never have to adjust the sharpness of an image during post processing. This creates a type of unattractive static which looks fake and generally unappealing. The sharpness button will not hide nor detract from motion blur captured in your image, which is a common misconception. Avoid it like the plague and your images will have naturally appealing focus. If you find yourself gravitating towards the sharpness button, delete the photo, turn off your software and start again in-studio. Add an additional light and, when a tripod is unavailable, prop your camera on a steady surface to shoot. Retake your shot and apply to your editing software again. Notes Floating Jewelry. To create the look of weightless or floating jewelry, stand a piece of card stock against the back wall of your light tent, hang the earrings over a small stick (I actually used a bottle rocket stick!), place that stick over the ridges of two glasses, at least five inches from your backdrop, and begin to shoot! I like to tilt my camera when shooting, to really fill the frame. If shooting straight up and down, you end up with empty (or negative) space on either side of the pair of earrings, which I find less effective than shooting corner to corner. Use a larger Aperture (remember, that’s a small F-number), which will reduce the focus on the back drop, and you have yourself a pair of floating earrings. You may need to crop (slightly) the very top of the earrings out of frame to hide or remove the stick, or, if you are handy with photo editing programs, you can remove the stick if it shows with some technical graphics know-how. Photoscape has a “clone stamp” which allows you to effectively remove unwanted elements from a shot, and for which you can find how-to information on their website or YouTube. Wearing Jewelry in Shots. I have neither the hands nor the neck nor the ears to compliment the jewelry, and unless you have the hands, ears or the neck, or employ a model who does, I would avoid the use of your own body parts in shots. Nothing detracts from a beautiful piece of jewelry more than damaged skin on which it rests. Or, in my case, damaged skin, broken nails, and blotchy tone! Use head forms, neck forms or hand forms, which can usually all be purchased for less than $10 a piece, and remember to correspond the color of your forms with the color of your background for a great cohesive look. Reflective surfaces. Avoid them. Acrylic is an acceptable reflective surface if you are using studio lights only, and a sufficient number of them, but an on or off-camera flash will completely destroy the integrity of your shot on any reflective surface unless heavily diffused first. Avoid using neck forms, displays or cloth that are reflective in nature, such as any high-shine leather, silk, or faux suede. The faux suede has tiny fibers which are all reflective in nature. You’ll find, in photos using these types of displays, every fiber is visible and reflecting the light away, ultimately, from your subject. Display forms and props are best if made from a faux (or real) wood or plastic that has a matte finish. Watermark. I highly recommend watermarking your images, at least until your brand and style are recognizable. In a technological age where images are, sometimes, used without permission, making sure your name is attached is incredibly important. Keep your watermark consistent between your images, and in frame but off your subject. You can even watermark with a website, if your web address is small enough. And that’s it. That’s Nicole Hanna Photography 101 in a nutshell, or a conch shell… or some other slightly larger shell. Some of these tips and techniques may not apply, and others you may blatantly choose to ignore and, you know what? That’s FINE! I don’t blame you if all the F-Stops and Aperture talk made your eyes glaze over while you succumbed to unintentional drool. Ultimately, the real challenge is to find your photographic voice, capture it and share it with others in a manner your clients find appealing. Do that, and your job is done. And, on your journey, I wish you the best of luck. Maybe I’ll meet up with you somewhere along the way. After all, I’m still discovering my voice as well. On September 1, 2014
It’s been one of THOSE weeks. You know what I’m talking about. The dinner burns. Every. Single. Night. My hand burns in the process. Or its stabbed ferociously with a knife while trying to scoop a piece of brownie out of a pan because ohmygodIneedsugar. Everything I picked up I dropped. Usually on another part of my body. I broke a light bulb. I tried to teach my son how to drive and… I assure you… many things almost broke that day. My husband was on vacation so it was a seemingly endless marathon of Duck Dynasty and American Pickers episodes radiating past the gentle hum of the air conditioner. But it’s also been one of the better weeks. I accomplished a lot, despite the mishaps. Three new tutorials (available here). Some designs sketched for all kinds of goodies, including a locket and goddess pendant, more hair pins and cuffs. And… as sickening as it may be to many of you…. I’m halfway through my Christmas shopping. I know! Trust me, I know how disgusting that is. But I can’t help it. I’m done by October every single year because the thought of being unprepared is so devastating to my organizing psyche that it wouldn’t be surprising if I were done by June. And I’m ending my third month of… dun dun DUN…. dieting. Okay. I don’t like that word. No one does. You know the verbal garbage we’re supposed to say: “lifestyle change”, which basically means a diet we do forever. But, I’ve lost 36 lbs, and I’m quite proud of that. I also sometimes stab myself with a knife in a desperate attempt to shovel rock-hard, week-old brownies in my mouth when no one is looking. Karma, eh? I wish I could say I felt the effort was worth it, but I think I might love cupcakes too much. However, my pants are lose, so I’ll take what I can get! Also, as projects keep me busier and busier, it’s come time to draw to a close custom orders while I focus on my designs-to-do list. I may, at some point this year, have an opportunity to open up my schedule to custom orders, but there are currently too many projects in demand of my attention at the moment, so this update has been posted on the Custom Design tab. Check the tab often for available openings for custom work. As always, custom orders are on a first-come, first-serve basis, once slots are available. I will not be reserving slots ahead of time. I have a huge beaded project in the works for next years Battle of the Beadsmiths, which will take up whatever time I have available when not designing new work. I can’t wait to share it with you all! Otherwise, it’s all been pretty mellow around here and I’m eager to start September with fresh ideas, projects, blog posts and whatever might tickle my fancy. My goals are coming along nicely, and I like the direction I’m heading. What about you? Are you heading in the right direction? Happy weaving! Nicole On July 27, 2014
We are almost there and I can’t believe it! Every day I am amazed and humbled by the enthusiasm, encouragement, the unyielding support and dedication I experience through every purchase, comment, share and like. Each of you have fed my passion with your own fervor, and my creativity has never been more fueled and inspired. Thank you! Thank you a thousand times. Thank you for helping me continue to pursue the fertile feet of my imagination, and make into reality every whim and fancy brought forth. You are the beautiful moss-covered rock upon which I lean when I feel least like creating… you push me to push myself, and I am a hot mess of wire without you! And I want to say thank you with more than words, which somehow seem such an insufficient expression of my gratitude. I need a giveaway. Twelve fun-filled hours of giveaways. And 5000 Facebook “likes” seems the perfect opportunity to make it happen. The theme for this giveaway extravaganza (because there’s always a theme) is “Past, Present & Future” and will feature:
All winners will be announced both on Facebook and here in this post, so check back during the day of (or after) the giveaway to see if you are a winner. All winners will have 24 hours to claim their prize! And because we will be breaking the internet and causing all kinds of trouble on Facebook, I must include the following disclaimer. By participating in this promotion, you understand and agree to:
Thank you so much. My heart is full because of you. Each of you. Every one of you. I couldn’t ask for more. Happy weaving! Nicole NOTE: Comments are moderated to prevent spam. Please allow 12-24 hours for your comment to appear. Also… this website is not optimized for phones. If you do not see a comment field below, please revisit from a laptop, desktop or tablet. Thank you! On July 8, 2014
I have been sick for three years. Pained, tired, panicked and broke, I have been in three hospitals, met with a dozen doctors, had two MRIs and four CT Scans, and could likely complete my own blood work more proficiently than the nurse. I have been called a liar and accused of medicated dependencies. I have lost most of my hair and feel unattractive every day. And today, my illness remains undiagnosed and my fear remains vigilant and constant. This is the story of many people suffering from chronic pain or illness. This is my story. Some days are beautiful: pain free, filled with productivity and an empathy towards those less fortunate. And in depressingly short supply. I haven’t learned yet how to live well with chronic illness, so the good days pass quickly, and the bad days settle over me like a soft and choking darkness. And I’m bitter. In my weakness, I have wished this on others if it means my own freedom from it and, afterwards, felt washed with guilt. On these days, I’m not proud. I feel broken and lost. But the good days…. those are magic. I feel complete, an active participant in life, looking forward, and not from inside a bubble of sickness. I create things I never thought I could create, and I breathe into those things all my health and none of my scars. And because of that, my creativity lacks something fundamental. It lacks the hollowness that is now as much a part of me as the surprise and the happiness and the positive, flickering energies. Creativity should be the sum of me, and not only the best parts. I have a chronic illness, but I am not my illness, and I will not be a victim to my body. I will have bad days, many perhaps. And I will put those scars into my work, the same as my positivity. Perhaps my work will suffer for it. Perhaps it will become an entirely new creature, breathing a ferocious will out into the world. Perhaps, on the surface, nothing will change besides my ability to let go of the pain. But today, I make the conscious decision to live better. To live the best I can, even on the worst of days. To allow the bitterness in, and then push it back out when I’m done. And when those bad days pour in for weeks or months at a time, I will not be afraid to release them into my work, and take back my life. Who knows. Though I have been sick for three years, and my illness remains undiagnosed, perhaps the decision to live despite it is a healing of its own. Nicole On June 23, 2014
First off, I’d like to apologize again for the Flickr kerfuffle, and to those who didn’t receive the finished tutorial in as timely a manner as I’d intended. Though I’m loathe to lay blame… I’m totally blaming Yahoo. And second, I’d like to thank you! Each and every one of you. Those who participated took a (rather confounding) set of instructions and turned them into unique and beautiful representations of the artist. Each had a voice so unique and so rewarding, that impressed is hardly a large enough word to use. And to the audience who supported the artists with comments and encouragement, thanks to you as well! Many of us create or continue to create as a result of the feedback and enthusiasm shown us. I am always humbled and amazed by the talents I witness through others during these contests. Not that I expect less from each of you, but that I expect more of myself as a result. Your works inspire me to pick up my tools and materials when I least feel like doing so. And, on a personal note, with a continuous barrage of health complications this past month, I was allowed a blissful escape via the art you’ve chosen to share with me. Thank you. You have been my oasis. Now on to the voting! I tallied up comments left on both Pinterest images and here on the blog, among which two artists stood out as clear favorites, in both the group and judged votes. With that said, I’d like to take a moment to stress that each entry was beautiful. Not only beautiful, but full of life. And despite the ease with which some of you completed your entry, and the frustration with which others did so, I enjoyed viewing each piece equally. The journey of the artist reveals itself in every turn of the wire and it’s a lovely path to walk. So, without further ado, let’s get to it. The winners are: Group Favorite: Adrienne Atadero who wins $25 (payable via PayPal), the finished tutorial piece (pictured above) and 10 tutorials of her choice. To claim your prize, please email me with your physical address, PayPal ID and choice of tutorials, at nikki.hanna@gmail.com. Judged Favorite: Judy Larson who wins 10 tutorials of her choice. To claim your prize, please email me your choice of tutorials, at nikki.hanna@gmail.com. Thank you again everyone! View the entire GALLERY OF ENTRIES here! Happy weaving! Nicole |
Enjoy my content?
Categories
All
Archives
February 2023
Follow Me!Search My Site!
Feed your creative spirit! Shop now!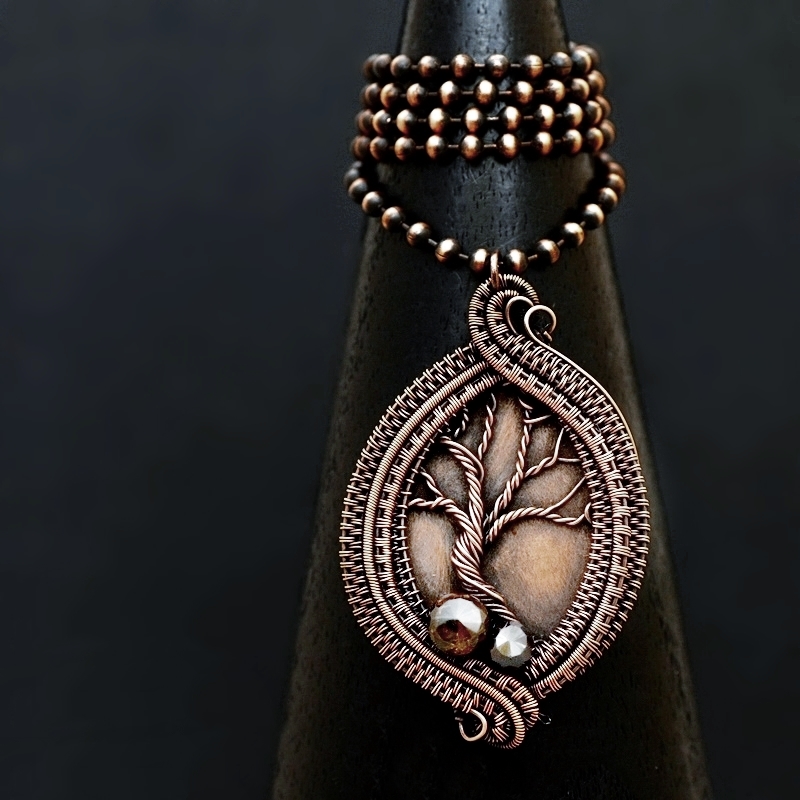
|